Networked DVD Ripping with Raspberry Pi and iSCSI
I’ve been working up to a better virtualization and storage setup for my homelab for awhile now. One part of this is cataloguing my media and expanding the virtual side of the media library. I have a legacy collection of DVDs and BDs which I’d like to import, and that means I need to rip them from disk. The decryption and transcoding process requires a decent CPU. The demand for high performance leads me to want to run this in a virtual machine (where it can get low priority access to a wealth of compute resources), but the need for a physical disk drive also makes me not want to walk down to the basement every time a disk is done to change disks. Thus, I want a networked disk drive for the virtual machine to read from.
iSCSI Enters The Chat⌗
After my previous experiments with iSCSI trying to network boot Windows diskless, I’ve grown to have a stronger appreciation for the benefits of iSCSI in the right use case. SMB (CIFS) is still the go-to choice for file sharing across networks, with server-enforced file permissions and wide OS support (basically, the only protocol Windows will speak), but sometimes it’s the wrong use case. I could setup a SMB share for a USB drive on a Pi, but then I can only read the mounted filesystem remotely, not the entire block volume, I can’t read bolume header information, and I can’t control the disk drive (i.e. eject it when complete). So, it’s not ideal.
Basically all modern storage devices in modern computers use only a few protocols, even with a wide variety of physical connection mediums. Quite a few of them end up back at the SCSI command set. The USB 3.0 spec has adopted SCSI over USB (‘USB Attached SCSI’) for mass storage devices, replacing the old USB mass storage command set, and allows this to be used over USB 2.0 as well. This means, if I can get a DVD/BD drive that supports UAS, it should show up as a SCSI device in Linux and thus I can route it over iSCSI to other devices on the network.
But, what is iSCSI? Simply put, iSCSI is a way to tunnel SCSI commands over a network. SCSI being a protocol to perform block transfers to block IO devices, this means that we can tunnel a block device, instead of a filesystem as we would with a protocol like SMB. The host side (‘initiator’ in iSCSI terms) is responsible for dealing with drive partitioning and formatting, and interpreting the blocks as a filesystem. The server side (’target’ in iSCSI terms) can choose to emulate the block device or pass the commands through to a physical device, or a partition on a physical device. In my case, I’m going to pass through the physical USB SCSI device, meaning the initiator will have full control of it (including all of the extra bits like drive eject).
The downside to using iSCSI over SMB or NFS is, since it’s a block device with the filesystem being managed by the initiator, we need to treat each target like a physical drive - we can’t have two clients sending commands to the same physical drive (normally). So, only one computer at a time can connect to each iSCSI target, and they have exclusive control of the device. It’s like the SCSI device is physically installed in the initiator’s machine. That’s exactly what I want with the DVD/BD drive, but this is not a protocol you should go to looking for general purpose file sharing.
Setting Up the Target⌗
To get started with iSCSI, we need a target and an initiator. The target is were the block devices are stored. Normally, iSCSI is used on SANs, and an iSCSI target may be something like a giant disk shelf / JBOD or large storage server providing virtual disk drives for VMs. But, here, we just need a simple Raspberry Pi. I used a Raspberry Pi 2, since it’s the best I had given the current Pi 3 and 4 shortages and how many older Pi’s I have laying around. It doesn’t support USB 3.0, but my DVD drive (already owned) does, so it should use the new UAS instead of USB Mass Storage protocol. I had to use an external powered hub, since the drive would cause power issues with the Pi every time it tried to spin up.
I first validated that the drive was actually showing up correctly. Before plugging in the USB device, I got a full list of what is in /dev already, then I plugged in the device, then I diff’d the two.
sudo ls /dev > before.txt
#Plug in your drive here
sudo ls /dev > after.txt
diff before.txt after.txt
You should see an sgX and srX device, and a bunch of other devices (cdrom, cdrw, dvd, dvrw, …) depending on the specs of your drive. The sgX device is the one we need here, it’s the raw SCSI device. If you look closely (ls -l /dev), you will see that all of the ‘bunch of other devices’ are actually just links to the srX device, which is the disk device.
I’m going to setup the target similar to my diskless Windows install, but instead use direct SCSI passthrough to a physical device. First, install the iSCSI target:
sudo apt install tgt
Next, create a config file for the target
sudo nano /etc/tgt/conf.d/targets.conf
The contents are a bit more complex than last time
<target lun.2021-10.net.apalrd:vdvd>
    backing-store /dev/sg0
    bs-type sg
    device-type pt
</target>
In short, we named the target ’lun.2021-10.net.apalrd:vdvd’, it’s backed by the physical SCSI device /dev/sg0 (which is the ‘raw’ SCSI device for my drive), the backing store type is ‘sg’ (‘raw scsi device’, the prefix sgX in dev), and the device type is passthrough.
Then, we restart and check that it’s working
sudo systemctl restart tgt
sudo tgtadm --op show --mode target
If there are any errors in the first step, use ‘sudo systemctl status tgt’ to see what they are. If it returns with no errors, then tgtadm should show one iSCSI target with two LUNs, one the controller and the other backed by the physical disk drive’s SCSI device.
Setting Up the Initiator on Windows⌗
Initially, I wanted to see if this worked at all, so I setup the initator on my Windows workstation and tried to rip a dvd using MakeMKV.
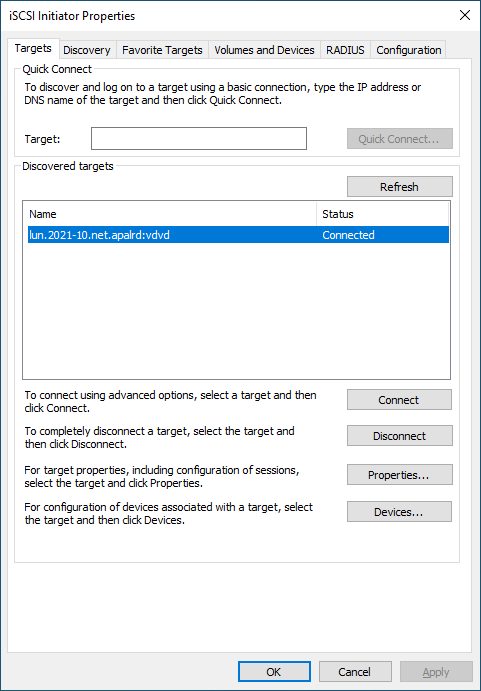
To use iSCSI in Windows 10, open the start menu and search for ‘iSCSI Initiator’. It will ask you if you want it to run as a service, click yes. Then, you can enter the IP address of the target and discover the LUNs it exposes, click one, and connect to it. If you go to Windows Explorer, it should show a new DVD drive, and it should be usable (although possibly very slow).
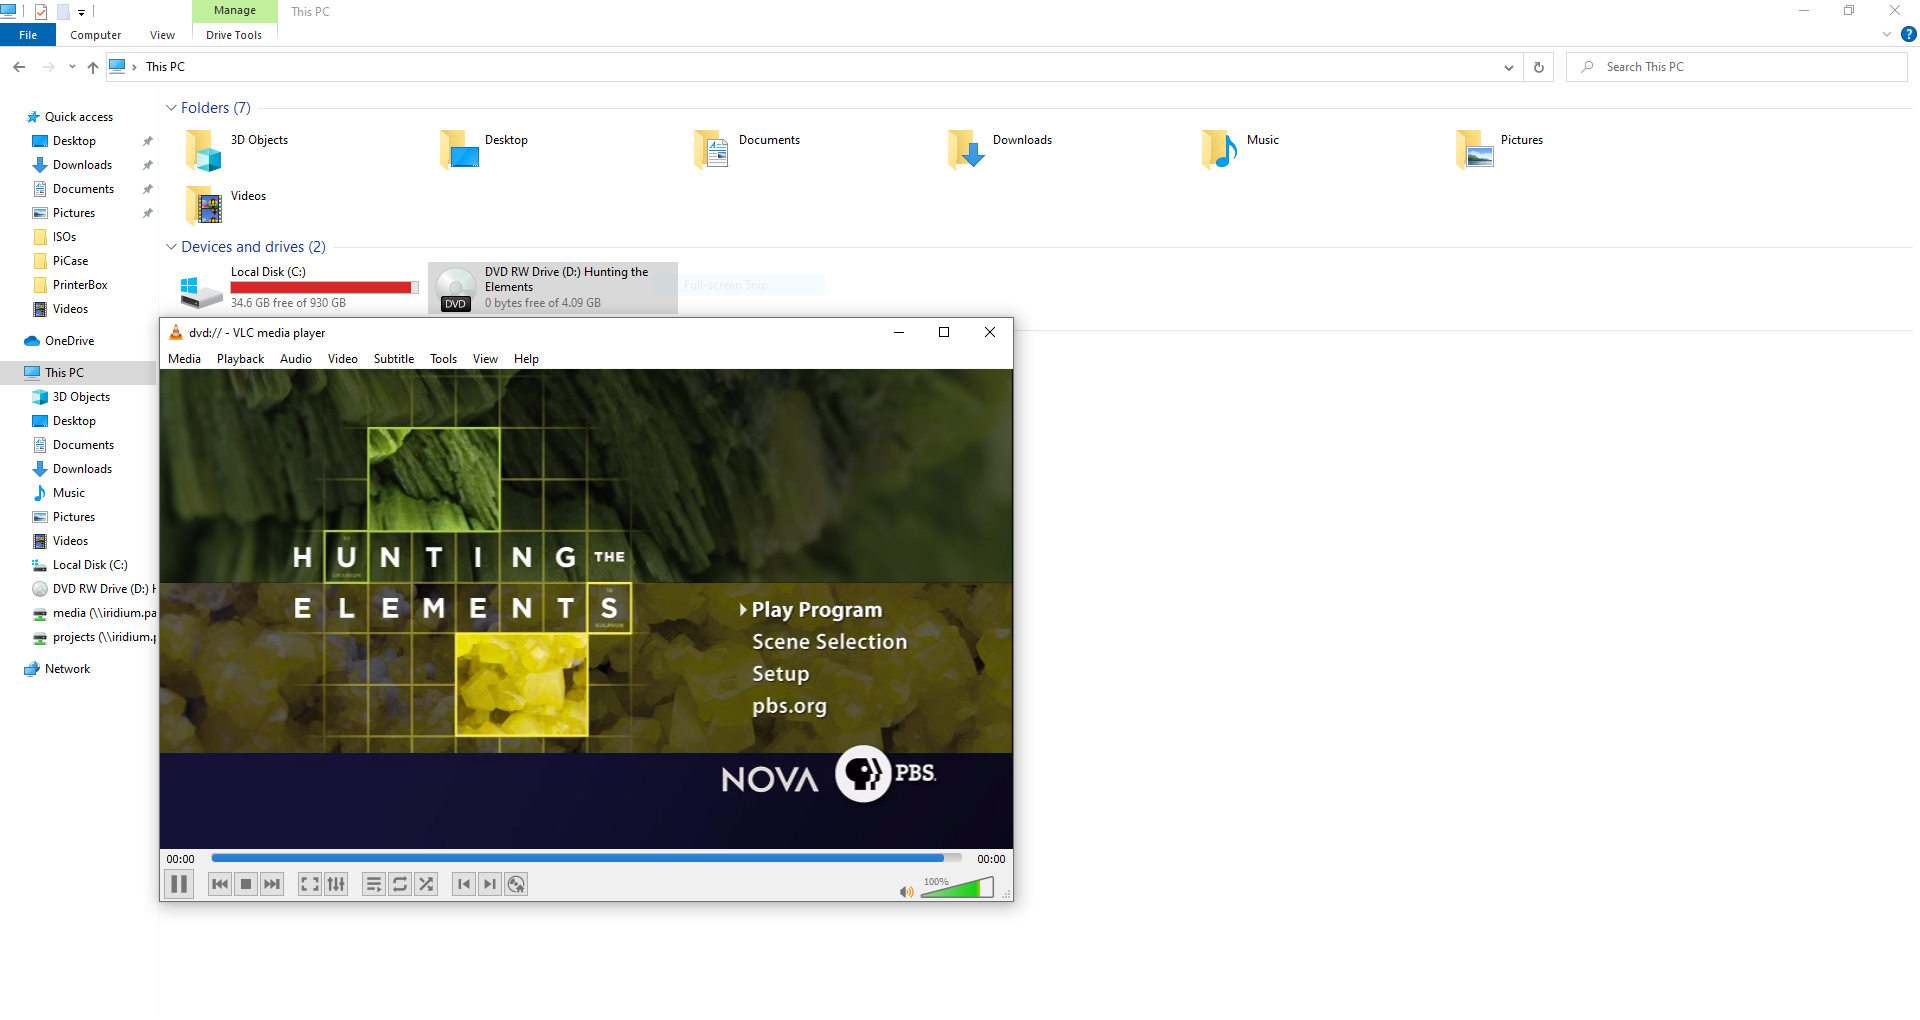
However, Windows seems to really struggle to use the DVD drive. It’s very slow. Handbrake was unable to rip the DVD at all, and MakeMKV was successful but at a rate of under a megabit per second. VLC was able to load the menu and navigate the menu, but couldn’t read fast enough to play back the content. I’m not sure what the issues is, but something about the setup is just not ideal.
(Note: I did try connecting the same DVD drive to a USB 2.0 port on the Windows workstation, and it did play, although it wasn’t super fast either, but it was at least fast enough to play back the DVD without any buffering)
I then moved on to Linux, hoping for a better experience.
Setting Up the Initiator on Linux⌗
First, we need a machine to run this, running Linux, and preferably with enough resources to handle decoding/encoding in Handbrake. I chose to install Ubuntu 20.04 LTS Server on a virtual machine which I gave 8 vCPUs to. Since ripping / transcoding is a background task, I recommend allocating a lot of resources at a low priority to this VM, since the automatic ripping machine can queue jobs for transcoding (since reading the disk is much less intense than transcoding it), so you could pop in a complete box set of a season of your favorite show, let it read the disks as fast as possible, and slowly work through the transcoding in the background without bogging down your other VMs if they are busy. If you install your VM from a virtual CD drive, make sure you detatch the drive entirely (not just remove the virtual disk) once you are done, otherwise, ARM will try to make use of that device for ripping (and that’s not what you want).
Now we must setup the iSCSI target:
#Not needed on Ubuntu 20.04, may be needed on your distro
sudo apt install open-iscsi
#Discover target
sudo iscsiadm -m discovery -t sendtargets -p <IP of your iSCSI Target>
#Login to target (no authentication)
sudo iscsiadm -m node --login
#Check that new devices showed up in /dev - should see a new sgX, srX, cdrom, ...
sudo ls -l /dev
#Save settings persistently, auto-start iscsi initiator on boot
sudo iscsiadm -m node --op update -n node.conn[0].startup -v automatic
sudo iscsiadm -m node --op update -n node.startup -v automatic
sudo systemctl enable open-iscsi
sudo systemctl enable iscsid
Then reboot to make sure the initiator came up and you still have /dev/sgX, /dev/srX, /dev/cdrom, etc. on your initator.
Automatic Ripping Machine⌗
For this project I decided to try and use an open source project called ‘Automatic Ripping Machine (ARM)’, which seems to be designed to do exactly what I want. I of course didn’t bother trying it in a setup with real working hardware, and jumped straight into getting it to run over iSCSI. Since I’m using Ubuntu 20.04 which is the OS they are testing on, they have a script to install on a bare environment. They note that the script has no error handling and is only for environments where you already know it will work, but I am using the exact version of Ubuntu so I ran the script (after reading it). It essentially follows a near identical path to the Ubuntu instructions (installing a ton of stuff with apt, cloning the repo, setting up udev, …).
After installing it and setting up a user, I popped a DVD into the (remote) drive. It took a while, and the drive made some noises, and eventually the disk showed up as active in the ARM web UI. It couldn’t identify the title, so it gave me 60 seconds to edit it before it started the rip. Unfortunately, it then tried to rip the DVD with handbrake-cli, and handbrake did not like the disk and failed. I tried several DVDs, getting the same result with each. So, given my results with Handbrake on Windows, it seems like it does not like the remote iSCSI drive. In addition, on the VM’s display, I was seeing a lot of IO device read errors, indicating a problem reading from the iSCSI device.
I tried to rip the disk as data instead of DVD, but that gave me a dmesg error about reading scrambled sectors without authentication (since it is a video DVD), and caused dd to exit without copying the DVD. Probably as expected. Again, I also got a lot of IO device read errors from the kernel.
Manual Ripping⌗
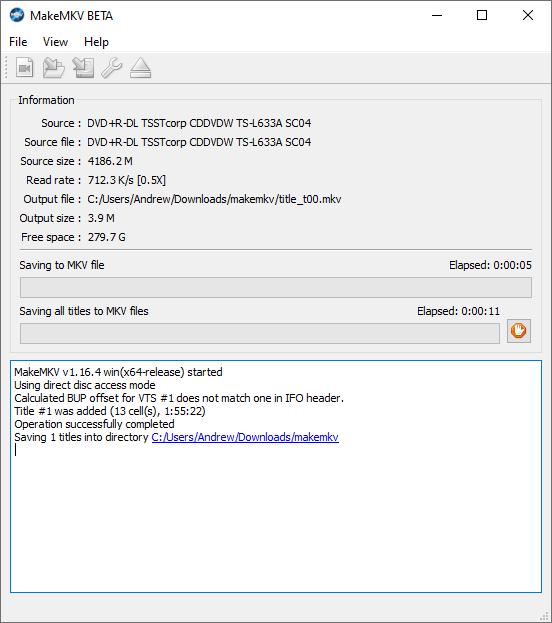
My final try on the Linux machine was to use makemkvcon (the console version) to rip the DVD. ARM installed this, so no install guide here. This worked on Windows, but was very slow. I logged in to SSH as the arm user (which is what ARM runs as, and has permissions to access the drive), and told it to rip the first title of the DVD (usually that’s the movie) to the home directory
makemkvcon mkv dev:/dev/sr0 0 ~
It found the disk, read the titles, and started working. It doesn’t have any sort of progress bar, and it pre-allocates the output file so I can’t look at the file size as an indication of how far along it is, but it seemed to be doing fine. There were no kernel errors at all. Networking about 30-40Mbps consistently from the iSCSI target device, which should mean the file should rip in under an hour (and also 50x faster than on Windows). This is not super fast, but it’s faster than the DVD would play back normally, so it’s reasonable to say this speed limit could be due to the DVD drive. I didn’t buy it for this project, it’s something I’ve had for years to install legacy software, so it might just be slow. Some drives are also known to slow down to only a bit faster than needed for playback when reading movies, for… reasons? As expected by the data rate, the command finished in just under a half hour, giving me an MKV file which played back correctly, with chapter markers and everything. It’s still in MPEG2 format as it was on disk, so it’s huge, but transcoding is something Handbrake can do without needing to access the device.
I also tried running the iSCSI target on a more powerful machine (a dual-core Atom, with USB3 and Gigabit Ethernet), using Ubuntu 20.04 Live Server, and got the same results. This means it’s not (largely) an issue with the Raspberry Pi, but there could be issues in tgt (since I used it for both tests).
As a final test, I installed MakeMKV on the Ubuntu Live Server (the dual-core Atom), and had it extract a smaller 2 minute title from the same disk (since live CDs put the root FS on a RAM disk, it can’t fit the full title). Based on the time it took to extract the 2 hour 30 minute title over iSCSI, I estimated it should take about 25 seconds for the smaller title, and the time was fairly close, so the speed is a limitation of the drive, and not the network or iSCSI overhead (at least with the Linux initiator, and using MakeMKV)
Conclusions⌗
Does this work? Yes. MakeMKV is able to use the iSCSI device on Linux at (what I think) is about the same speed as it would on a physical device. However, not every program was able to access the device, and a lot resulted in transfer errors. I think iSCSI is a valid approach to this problem, but I need a better software stack to implement it (possibly using MakeMKV exclusively to deal with the disk, since it seems to have no problems with iSCSI on Linux). I am also pretty impressed by how well the Pi worked out as an iSCSI target, despite the low power and data throughput.
It’s possible I could abandon ARM and do it on my own. I don’t particularly need all of the features of ARM, and it seems to have gained an absolute ton of feature creep over the years (just look at all the options for notifications, IFTTT, etc.) but the core ripping code is still a pretty simple python script. I could also avoid iSCSI and run MakeMKV on the Pi directly, dumping the ripped file to a network share which the transcode VM scans, but I’d need to keep the temporary files on the network as well to avoid SD card wear. Maybe I just need to fork ARM and modify it to use MakeMKV for DVDs in addition to BDs, and Handbrake for transcoding the resulting file.
Whatever method I go down, I’ll be sure to document it in the future.