Christmas Maze Boxes
This Christmas, I printed a whole series of maze boxes as gifts for family members. After finding a gift maze model on Thingiverse, I felt like there must be a better solution to programatically generate mazes of varying difficulty, and so each person who gets one has a unique experience. Before writing such a program myself, I checked to see if it had already been done, and sure enough it had. In this case, Adrian Kennard had written a C program to generate puzzle mazes, and hosts an interactive version on his website. His tool generates OpenSCAD code, which can then be used to generate a surface model to 3D print.
The Workflow⌗
My workflow for this requires a few tools, all open source:
- Adrian’s Interactive Puzzle Box Generator to generate the maze
- OpenSCAD to generate a surface model from the solid body
- PrusaSlicer (or a slicer compatible with your printer) to generate G-code for the printer
Generating the Puzzles⌗
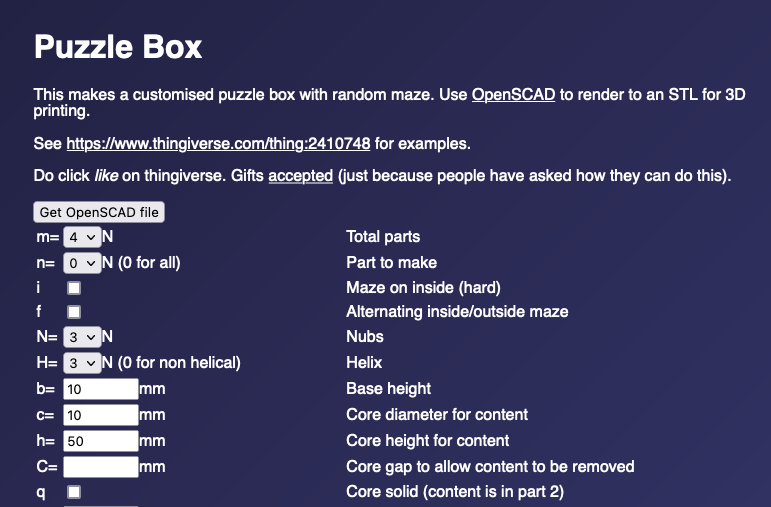
Adrian’s puzzle box generator is used to generate an OpenSCAD model of the maze, including all of the parts. I used mostly default parameters, but there are a few I changed:
- m (total parts to make) = 2 (outer + inner) for most people, or 3 (outer + middle + inner) for people I really wanted to challenge - printing fewer parts drastically reduced my workload later on, since printing the default 4 parts in separate colors for each person would be a huge pain. That said, I did one maze with the total parts set to 4 and it was a very fun challenge for the recipient.
- c (core diameter for content) = 15mm - I found that 10mm default was too small for big American fingers to fit inside to get the goodies out
- h (core height for content) = 75mm - I wanted to be able to fit $1 bills inside, so it needed to be big enough for USD
- X (maze complexity) = varied from +-10 uniquely for each person - I tailored the difficulty to what I thought they could handle. Most family got a difficulty of 0 (average), close friends got 5-6 (I want to challenge them). I didn’t make anyone’s more difficult than +6, and I had to solve one or two of them for reasons I’ll describe later and the +6 was quite at least a half hour challenge for me.
- s (number of outer sides) = 6 - The default is 7, but the default is to have a maze with 3 nubs (i.e. the maze is triplicated around the perimeter of the shape). Since 3 is not divisible by 7 (both are prime), this means there is only one way to assemble the maze where the septagons will line up when finished, and two ways to do it wrong. This caused me to assemble one of the first mazes incorrectly, and have to solve it completely, rotate it one nub over, and close it, etc. until I realized that I should change the number of outer sides to 6 for future mazes so there’s no way to assemble it without the hexagons lining up.
- S (text on sides) = the person’s name
- T (text scaling) reduced from 1 if their name didn’t fit
- O (text outset / embossed) set randomly, so some are embossed and some are raised
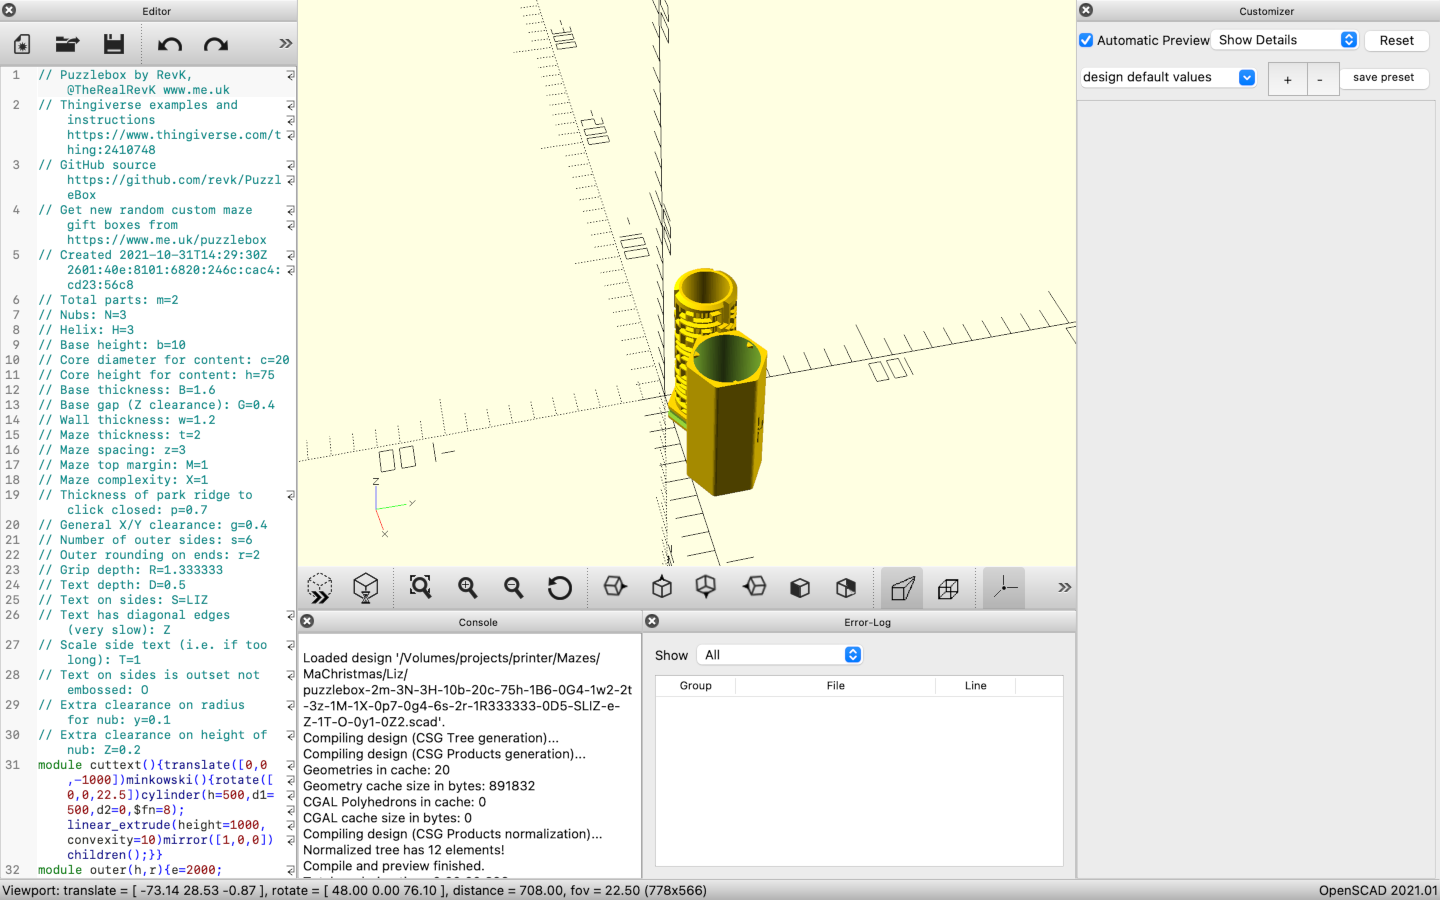
Rendering in OpenSCAD⌗
Once the scad files were generated for every person’s unique maze, I had to render them to a format which could be sliced. OpenSCAD is a tool which uses code to generate solid bodies. OpenSCAD is a sort of scripting / programming language, so it’s very easy to generate parametric solid models using the code. The tool itself then renders the solid model, and can convert it to other solid and surface formats. Once you open the scad file from the puzzle box generator in OpenSCAD, you need to render it (Design -> Render), and then export the render (File -> Export -> Export as) in the format of your choice (AMF/3MF are both good choices).
Slicing in PrusaSlicer⌗
I have a Prusa printer, so I use PrusaSlicer to generate the gcode for the printer. However, the process so far has led to a single file which contains multiple parts, and I’d like to print each part separately (without an MMU). This means I need to split the part into multiple objects, and then generate a gcode file for each one separately.
It’s very easy to do in PrusaSlicer, thankfully. Right click on the object and click Split -> To Objects. This will take the multi-object single object and turn it into multiple objects. Now, I just disable them one at a time and generate gcode with one part of the print visible. Since I’m planning on printing these in a huge variety of colors, I didn’t bother trying to match up all of the prints of one color onto the bed, I just printed each part individually. So, now I have around 50 gcode files to print, each one taking under 2 hours (with the 0.3mm DRAFT profile, since it’s perfectly adequate for the level of detail in these mazes).
Final Assembly⌗
After a print was done, I put it in a bag with the recipient’s name on it. I kept all of these in a bin and would print 1-4 pieces per day, depending on how I was feeling and if I had anything else to run on the printer, batching them by color. It took roughly a month to get them all done, but of course the printer wasn’t running full time, I printed other things, and I was also sick for a week and didn’t print anything.
For each maze, I had to stuff the maze with a $1 bill and a note, then solve the maze in reverse to assemble it. Thankfully, when you have the puzzle box open, you can examine the maze and find the correct path to close it, whereas when solving it without knowledge of the whole maze is far more difficult. Unfortunately, there were a few times where I had to solve the maze to open it again, due to the septagon/hexagon problem described above, but this was fairly rare. However, I definitely have an appreciation for the difficulty of solving this, especially if you aren’t expecting it and aren’t entirely sure how it works.