Selecting Policy Routes in OPNsense from Home Assistant
Policy-based routing has a lot of applications in a home lab or home network. It can be used to change the route taken based on the source or destination, and this can be used in multi-WAN or VPN applications to selectively choose traffic to send over one WAN or which traffic to route over a VPN. It can also be used to selectively drop traffic instead of routing it. Having the ability to change some of these routes from Home Assistant makes it possible to control some of these functions from the HA app or via automations. One possible use case is to drop traffic from a client entirely when selected, as a rudimentary parental filter. Another, more complicated example of this is routing a media player through a VPN service to avoid geo-restrictions - the ability to enable/disable the VPN tunnel or change which VPN interface is in use, for a specific client, is something that might be useful to allow users to control via the HA app. While I use VPNs in my configuration, all of this would apply equally well to multi-WAN routing.
As a bit of a warning, everything here assumes the device you are controlling has either a known IP address (v4/v6) or a known MAC, and the device does not intentionally change its IPs or MAC to avoid the firewall rules. For MAC based entries, OPNsense will periodically scan the ARP/NDP cache for all known IP addresses and use those in the firewall rules, so it’s possible for traffic to ’leak’ if the host in question changes its IPv6 (e.g. due to using a temporary privacy address). However, relying on the NDP cache is the only way to identify IPv6 SLAAC client addresses.
IPv6 Quirks⌗
For IPv6, you also have to deal with the potential for devices to have a globally routable IPv6 address using the prefix from the wrong interface (assuming you are getting a prefix delegation from each of your upstream WAN/VPN interfaces). This probably means you will need to rely on NPT (network prefix translation) for all but the primary WAN, or NAT66 if you are using a VPN interface which provides a /128 address instead of a prefix. Clients expect to see a 2000::/3 address as ‘global’, so using a ULA range for your network and prefix translating or NATing all of the interfaces will result in many clients preferring IPv4 over IPv6 since they don’t believe an FC00::/7 address is routable to the Internet. Hence, you need to pick one of the interfaces which has a global prefix and use its prefix for your internal network, then translate or NAT all of the other interfaces to that prefix. Not great, but for homelabs / home networks where we don’t buy our own address space and peer using BGP, it’s the best we can do.
Setting Up OPNsense for API Control⌗
OPNsense has an API which we can use. They have some documentation on using the API, and large tables of the API endpoints. In particular, we are interested in the Firewall API. However, there isn’t a good way to control firewall rules via the API. The best we have is control of aliases. Thankfully, this is very powerful, we can (manually, not via API) write a rule which forwards traffic in a named alias over the VPN route, and then selectively add/remove the host in question from the alias in response to the command from Home Assistant. If the host isn’t in the alias, then the traffic won’t hit the VPN forwarding rule and will instead fall through to other rules or the default gateway. Great!
The basic logic of the aliases I am using is as follows:
- Alias is created with the name of both the device and the destination. Alias contains the MAC address of the device.
- Alias is created with the name of the destination only. Alias contains all of the other aliases which could be routed to this destination.
- Firewall rules (IPv4/IPv6) are created for each destination, reading the alias for their respective destination
- API calls will enable/disable each alias created in #1, causing the alias in #2 and rule in #3 to include or not include the IPs corresponding to the MAC of the device.
Now for a graphical tutorial on how to set the OPNsense side of all of this:
Create an API user and add it to your secrets.yaml file⌗
Follow the directions in OPNsense’s Using The API docs to create a new user for the API, and generate API keys for it. Add the API key and secret as two entries in your home assistant secrets.yaml.
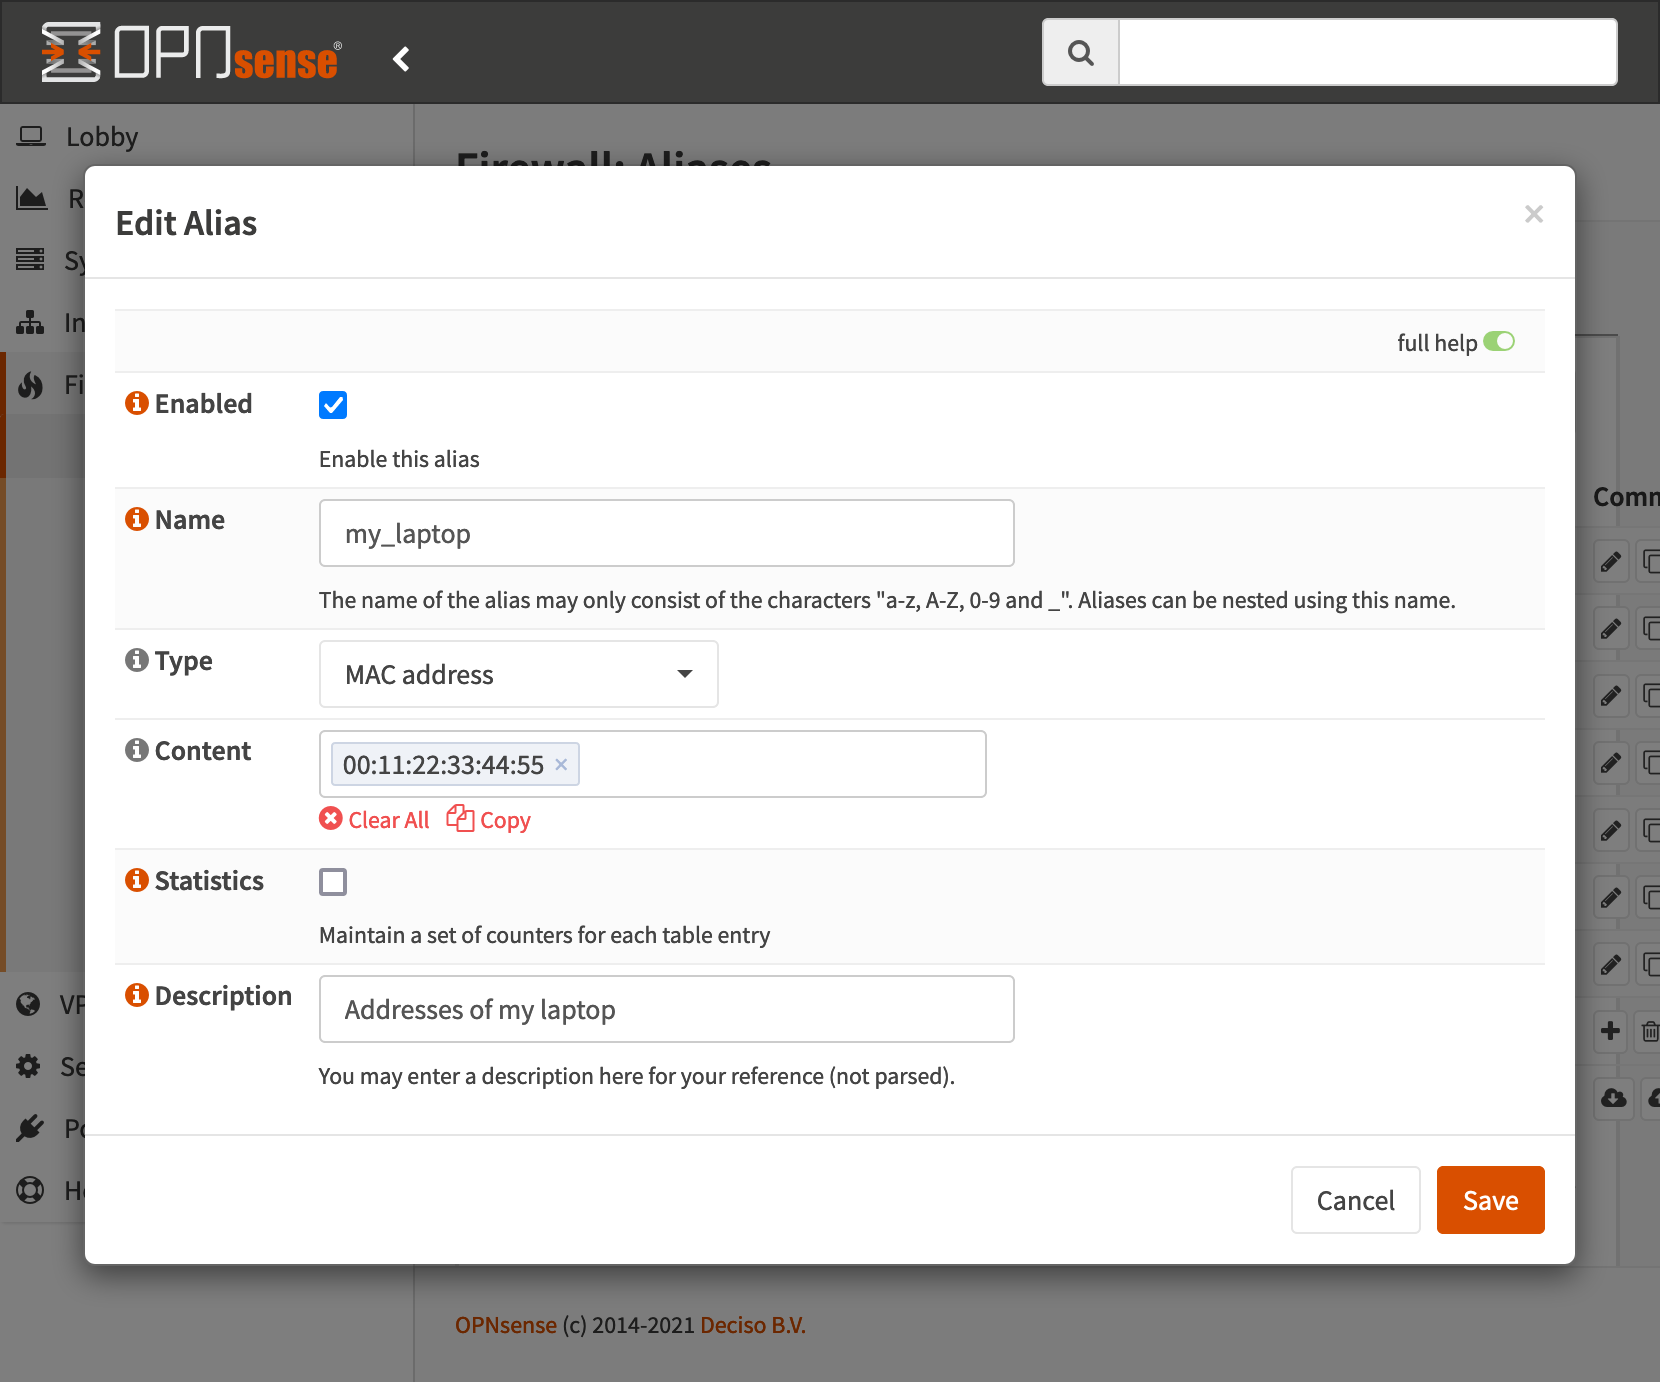
Setup the Device MAC Alias⌗
Create a new alias, type is MAC, give it the MAC address of the device in question. OPNsense will periodically scan the ARP (IPv4) and NDP (IPv6) caches to determine what the most recent IP addresses of the device are. Once this is created, we can use the name of this alias later to reference this device. Since we enable/disable this alias to control routing, we need one of these for each destination, all with the same contents.
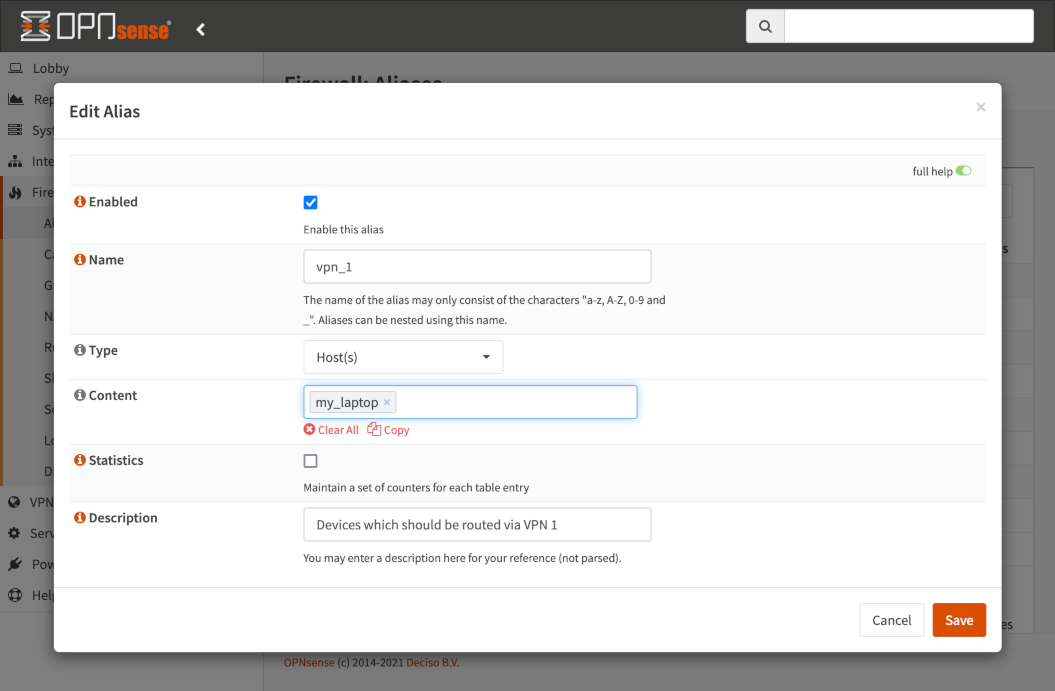
Setup the Destination alias⌗
Create a new alias, type is Host(s), enter a descrpition, and add all of the aliases of hosts which can be routed to this destination. This will be referenced in the firewall rules later.
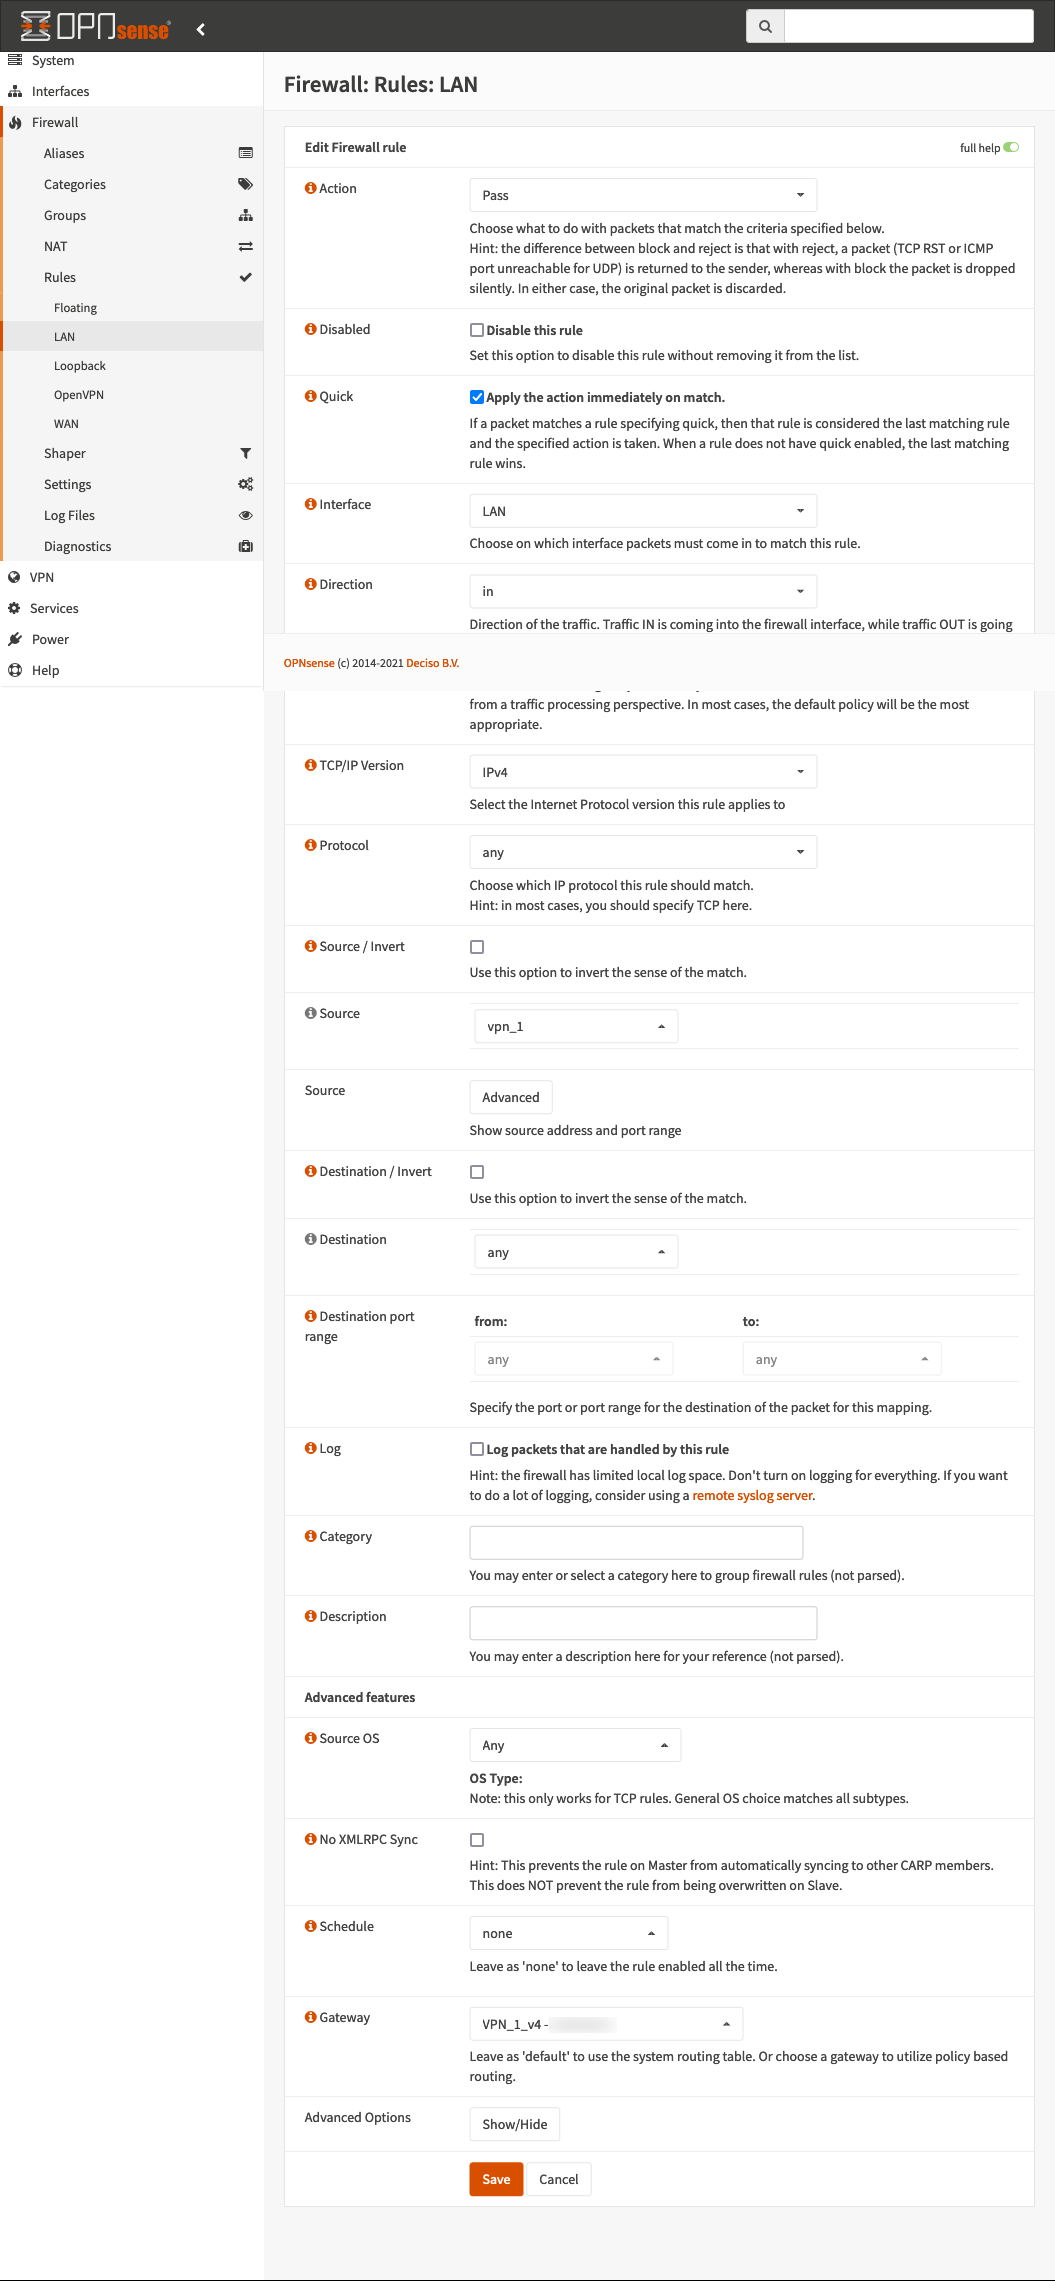
Setup the Destination routing rules⌗
Create two new firewall rules, one for IPv4 and one for IPv6, which route any traffic from the destination alias to the gateway of the destination interface. We need two rules here since IPv4 and IPv6 traffic will have separate gateways. All of this assumes you already have your desired outbound gateways setup and working properly on its own. I have an IPv4 example below, but you’d need one for each to select the correct IPv4/IPv6 gateway.
If you are dropping traffic instead of routing it, you can create a single rule for both IPv4 and IPv6, and set it to Block instead of Pass.
Home Assistant Configuration⌗
Now we need to configure Home Assistant to enable/disable our aliases.
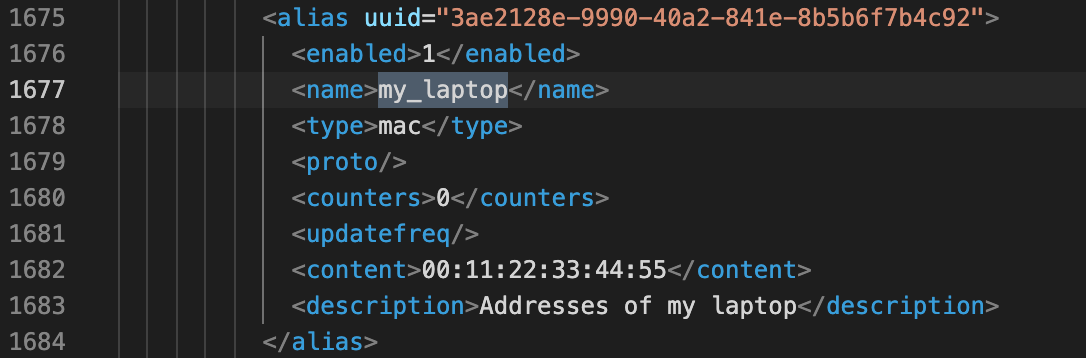
Determine the UUID of the aliases we created earlier⌗
The easiest way to do this is to backup the configuration in OPNsense, open the resulting XML file in a text editor, and search for the name you gave the alias. You should find an alias and it’s corresponding UUID nearby. We will need the UUID for all of the device->destination aliases for our automations.
Create RESTful Commands in Home Assistant⌗
In our case, we need to access two API endpoints - one to enable/disable the alias, and another to reconfigure (which also updates firewall rules if required). The first command takes the UUID and boolean as parameters, the second takes no parameters.
Add this wherever you put your rest_commands section, either in configuration.yaml or a file you’ve included below it:
#Rest Commands
rest_command:
    firewall_alias_reconfigure:
        url: "https://192.168.1.1/api/firewall/alias/reconfigure"
        username: !secret firewall_key
        password: !secret firweall_secret
        method: "post"
        verify_ssl: false
    firwall_alias_enable:
        url: >
            {% if enable %}
            https://192.168.1.1/api/firewall/alias/toggleItem/{{uuid}}/1
            {% else %}
            https://192.168.1.1/api/firewall/alias/toggleItem/{{uuid}}/0
            {% endif %}
        username: !secret firewall_key
        password: !secret firweall_secret
        method: "post"
        verify_ssl: false
Create Input Boolean and associated Automation⌗
Finally, we can create an Input Boolean to select if my laptop should be tunneled over the VPN or not, and an Automation which runs when the Input Boolean changes. The Automation needs to call the enable service with the uuid of the rule we want to enable, the new value of the Input Boolean, and then call the reconfigure service.
And, the automation:
alias: Laptop VPN Route
description: ''
trigger:
  - platform: state
    entity_id: input_boolean.laptop_vpn_route
condition: []
action:
  - choose:
      - conditions:
          - condition: state
            entity_id: input_boolean.laptop_vpn_route
            state: 'on'
        sequence:
          - service: rest_command.firwall_alias_enable
            data:
              uuid: 3ae2128e-9990-40a2-841e-8b5b6f7b4c92
              enable: true
    default:
      - service: rest_command.firwall_alias_enable
        data:
          uuid: 3ae2128e-9990-40a2-841e-8b5b6f7b4c92
          enable: false
  - service: rest_command.firewall_alias_reconfigure
mode: restart
What About DNS?⌗
All of this routes the traffic using policy routing, but DNS isn’t traffic being routed through the firewall, it’s traffic that ends at the DNS resolver (Unbound) whithin the firewall. So, we end up with a less than ideal situation where everything on the network is still using the same DNS resolver, even if the traffic takes a different path.
There are a few ways to handle this:
- Use Unbound as a DNS forwarder using DNS over TLS (DoT) and rely entirely on that (so all DNS goes directly over the default gateway, but via TLS to a provider like Quad9). This means the DNS requests don’t go to the VPN provider at all, but are still separately protected using TLS on their trip to Quad9.
- Use Unbound or Dnsmasq as a forwarder, and rely entirely on the DNS servers provided by the VPN provider, so all clients use the VPN for DNS via the forwarder.
In addition, you should create a rule ahead of the policy routing rules which specifies that traffic where the destination is ‘This Firewall’ pass, and to ‘Apply action immediately on match’ to prevent it from trying to route DNS traffic incorrectly. OPNsense already does this for DHCP, but not for DNS.
Expanding This to Other Applications⌗
So, now that we can enable/disable firewall rules, here are a few ideas you can take away from this:
- Selectively block a list of devices from accessing the internet, by enabling/disabling the alias used by a block rule, using any logic you want (parental control type rules)
- Manually select to use a secondary WAN interface in a similar way to selecting the VPN interface
- Use an input select instead of input boolean to choose one of many routing options