Installing a Whole-House Per Circuit Energy Meter
After setting up my 1-Wire Temperature Network, my next sensory target was my AC breaker panel. I watched reviews for products such as the Sense energy monitor, The Energy Detective, and a few others, and felt like none of them did what I wanted. I know that big loads in my house use a lot of power (duh), I want to know how much power specific people and rooms in the house use, so I can improve my home energy modeling skills. This, to me, required a sensor on each device or circuit, to directly measure as much as possible and not rely on ‘AI’ buzz to pick out a few major appliances.
The Brultech GreenEye Monitor⌗
The energy monitor I chose is the Brultech GreenEye Monitor (GEM). I chose this monitor because of the following attributes:
- Offers WiFi and hardwired Ethernet, with a well-documented and purely local API (no cloud required)
- Offers 32 channels of true power monitoring (although it only measures phase voltage on one phase of a split-phase North American supply, so there will be a very slight error on half of the channels). This is a lot of channels for one device
- Packages include donut CTs for regular circuits (40A or less) at an excellent price per circuit compared to anything else on the market
- It also has pulse and one-wire monitoring, but I already have a 1-wire network so I won’t be using either of those features
I ended up buying the GEM+CT Package and getting 32x 40A donut CTs, plus buying an extra 3x 60A split CTs for really big circuits. Since the total number of circuits in my panel is 33 (including all double-pole circuits once), I left out the master bath jet pump circuit since it’s infrequently used and did not monitor the mains. I had a 20A and a 15A double pole circuit which I used with one 40A donut CT each (same as all the other 15A and 20A circuits), since they are for motors with no neutral. I had a 60A air conditioner which got a single Split-60, and a 50A stove and cooktop which got a pair of Split-60s wired electrically to the same channel on the GEM.
Installation Process⌗
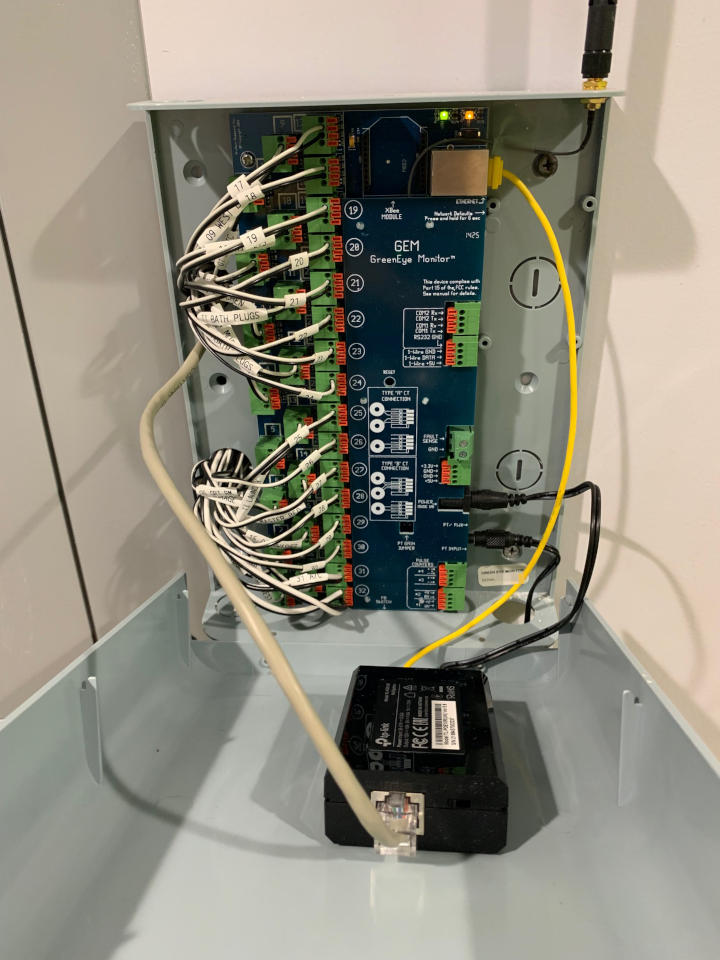
Installing the CTs took awhile, and with the power off to the whole building, I didn’t get any pictures of the process. Before I turned off the power, I made heat-shrink labels for each CT with a number on them so I could keep track of the CTs. I turned off the main breaker, removed the cover, and planned the wiring route for the 33x CT wires. I mounted the GEM next to the breaker panel but close enough that I could route the wires around the side without crossing over a stud, and ran the wires through a plastic bushing in the bottom of the panel, through the wall, and into the GEM. Each 40A donut required me to unscrew the wire from the breaker, remove it, slip it through the CT, and screw it back in to the breaker. Every few circuits I zip-tied the CT wires together and neatly dressed them down both sides of the panel, across the bottom, and out. I went down one side with the CTs numbered 1-15, and then down the other side with the rest of the 40A donuts, and then did the 60A ones last. I knew I’d be able to count breakers later to match CT numbers to circuits. Once the GEM was installed, I planned on running a tap off an exsting 15A circuit to a new outlet box right at the panel (the nearest outlet is ~8’ away), but I didn’t end up doing that. I closed the panel and power was restored, and there was much rejoicing.
After physically installing the GEM, I pulled a new Cat5e wire from the patch panel into the GEM and crimped it with an RJ45 male. I ran a 6’ 2-wire extension cord to the GEM to power both of the power supplies - the GEM needs an AC reference voltage which it gets from an AC wall-wart, plus a 5V DC supply to power itself.
Setting up the Software⌗
I had just finished setting up Telstar, my automation server, and was eager to capture the data from the GEM in Node-Red. I ended up setting the GEM to do an HTTP request to a webserver at a fixed interval (5sec) with each value as a parameter. I setup Node-Red with an HTTP In node to capture this, then used some node-red commands to filter out and parse the strigns into floats (they all come in as strings, unfortunately), then I wrote some Function nodes to take the derivative of the energy totals and re-bundle everything into JSON to pass to MQTT. The Node-Red flow I used to do this is available below.
Shortly after getting all of this working, I realized that I can’t tell the difference between power being out (actually out), something wrong with the GEM, or someone accidentally unplugging my 6’ extension cord. To remedy this, I got a PoE splitter and taped it to the case of the GEM with double sided foam tape. It outputs the 5v that the GEM needs to power itself, and is powered by my PoE switch which is backed up by a UPS. Now, I can look at the voltage reported by the GEM (which should be around 120V) and tell if either the power is out or someone unplugged the potential transformer, and fix the situation, without losing connection to the GEM in the process. The PoE splitter I used is a TP-Link TL-POE10R.
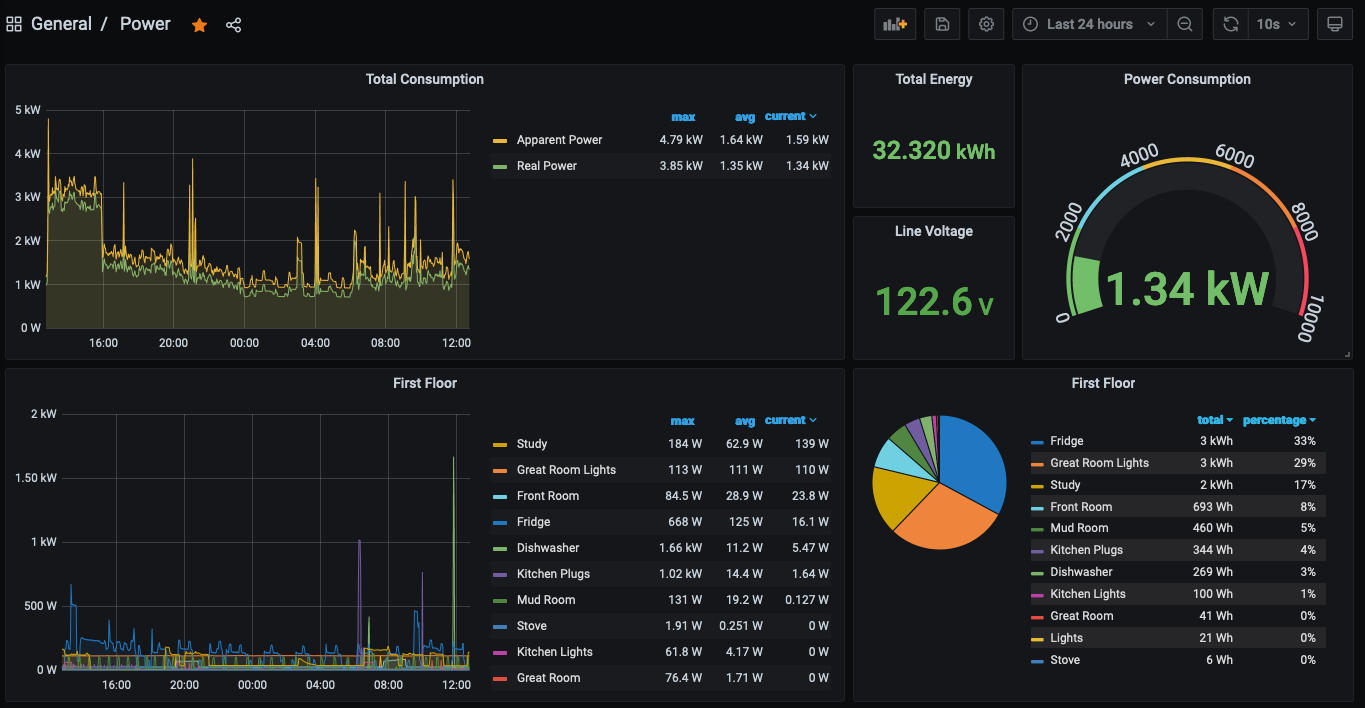
Using my brand new Grafana server, I started experimenting with the best way to view the data. I’m not ready to share the entire graph code, but I have a dashboard showing total power consumption today, current line voltage, and pie charts showing total energy usage for each floor of the house. I also have a few charts of ’everything’, which are really difficult to view but are designed to be exported to a csv for analysis.
The Project Files and Parts List⌗
Here are links to the files and parts required to make this project.
- Brultech GreenEye Monitor (GEM)
- Node-Red Flow to parse GEM packet into MQTT
- TP-Link TL-POE10R PoE splitter 802.3af
Update Spring 2021⌗
Someone tripped over the AC reference supply and broke it, since I never finished wiring the outlet right at the breaker panel. I emailed Brultech, since I was unable to find a power supply with a 3.5mm jack. I provided my serial number, and they sent me a new one for just the cost of shipping (from Canada). The new transformer arrived and power measurement is working again. Happy with the customer support from this company.