Layer 4 vs Layer 7 Reverse Proxies: Using HAProxy to front Web Services (for IPv4 to v6 Transition)
A common challenge in web design and network architecture is grouping multiple web services in a single host, or behind a single IP address. This is especially true with IPv4 due to the scarcity of addresses. The solution to this is a reverse proxy or load balancer. Essentially, this takes connections from clients and dispatches them to the correct server based on the domain name or URL in the request. In this video, I’m going to explain what a layer 4 or layer 7 load balancer even is, and setup a layer 4 example using HAProxy. So come along on this adventure!
Contents⌗
- Video
- Transport Layers of HTTP
- HAProxy Setup
- HAProxy - Install
- HAProxy - Configure
- HAProxy - Configure - Default Config
- HAProxy - Configure - HTTP Redirect
- HAProxy - Configure - HTTP Layer 7
- HAProxy - Configure - HTTPS Layer 4
- HAProxy - Logging
Video⌗
Transport Layers of HTTP⌗
So to understand load balancers and reverse proxies, let’s take a look at what a normal modern web session looks like:
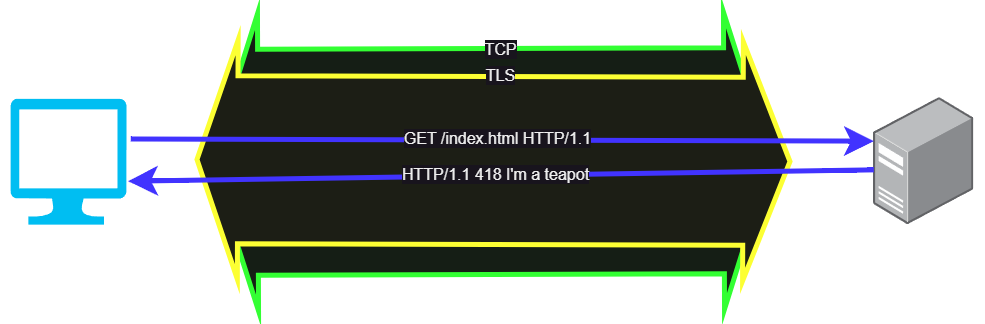
With HTTP/1.1, the HTTP commands are tunneled inside a TLS session, and the TLS session is itself inside a TCP socket. To setup the connection, the web browser sends out a TCP SYN and the 3-way handshake is done, and once the tunnel is open the client can send the Client Hello message to begin establishing the TLS session. Once that’s done, within the TLS session the HTTP commands can be sent and information can be exchanged.
In this case, TCP is our layer 4 transport protocol, establishing a long-lived tunnel out of layer 3 IP packets. Within the transport is our TLS sesssion and HTTP session, which are generally grouped together as the application layer, or layer 7.
Our proxy will sit somewhere in this chain and intercept messages so we can modify them or dispatch them to the correct back end server. In short, if we are interrupting the TLS session, we are proxying at layer 7, and if we are passing through the TLS messages unmodified we are proxying at layer 4. Since all of this happens at layer 4 and above, we can also use a proxy to change the layer 3 protocol from IPv4 to IPv6, meaning we can keep our internal network entirely IPv6 as long as the first proxy the client hits supports IPv4.
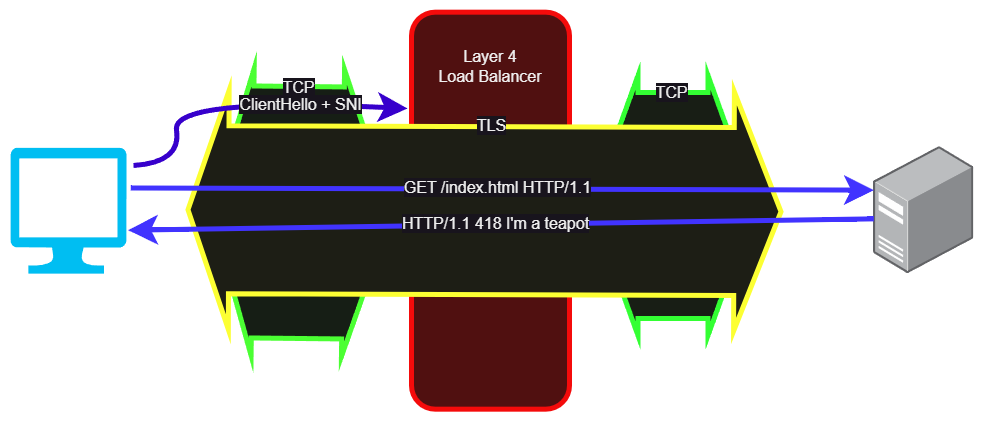
So with layer 4, TCP comes in, TCP goes out, and the only thing we can see is the Client Hello before everything is encrypted. Thankfully the Client Hello includes the SNI, or the domain name of the site, but not the full URL. This is just enough information for us to choose a server based on its domain, and let the server handle the TLS side of the transaction.
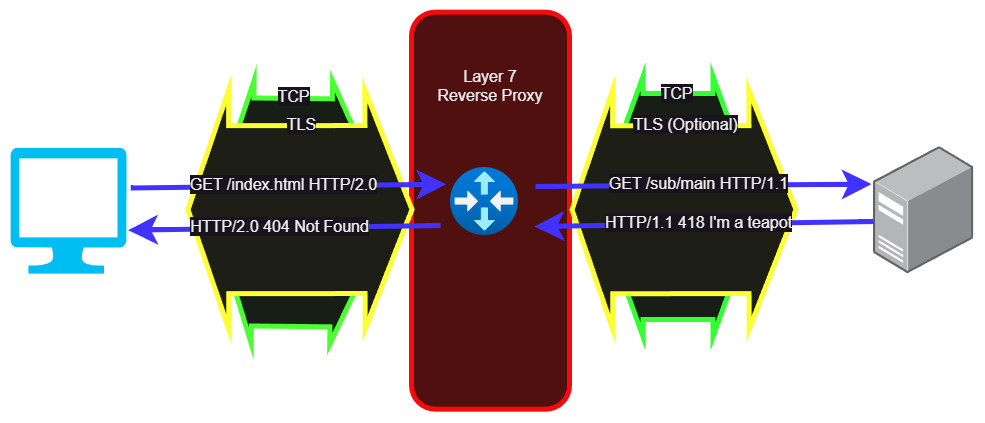
But with a layer 7 proxy we are intercepting the TLS sessions. At a minimum, our layer 7 proxy needs to have the TLS certificate and key so users can authenticate to us. We also have the opportunity to inspect the entire HTTP request, convert from HTTP/1.1 to HTTP/2 or HTTP/3, and possibly connect to the backend server via a separate TLS session or via unencrypted HTTP. Since we can inspect the entire URL in every query, we can redirect different paths to different servers, rewrite paths, rewrite responses, cache things, and basically change whatever we want. Even if we aren’t changing or caching anything, we can also use this architecture to move cryptography off of the application servers, helping spread the load around the whole system.
While either of these could be called a ’load-balancer’ or ‘reverse-proxy’, a layer 4 proxy would be more likely to be called a load balancer, while a layer 7 proxy would be more likely to be called a reverse proxy.
In case you’re confused on why this is a ‘reverse’ proxy, a normal or ‘forward’ proxy would act on the other side, between a group of clients and the internet. This can also be a layer 4 or layer 7 proxy, and is often used to give clients heavily filtered, monitored, or cached access to the internet.
HAProxy Setup⌗
For my setup, I’m using a layer 4 TCP proxy for secure connections and a layer 7 HTTP proxy for insecure connections. I could also just have a blanket redirect in the proxy that tells all HTTP users to go to HTTPS, so I threw in the config for that bit too. My backends are all IPv6, so IPv6 clients can go straight to the web server while IPv4 clients all have to go through the proxy since they are all sharing the same v4 address.
Installing HAProxy⌗
This one’s crazy simple. We just install it from apt!
apt update && apt install haproxy -y
Configuring HAProxy⌗
Feel free to pick and choose the config snippets from the next section as you’re building your config. Some of these examples are mutually exclusive, so read the notes carefully! The file is /etc/haproxy/haproxy.cfg by the way.
Default Config⌗
I left the default config from Debian alone, so here it is in case you’re curious. I added all of my config after this.
#Default global configuration from Debian upstream
global
        log /dev/log    local0
        log /dev/log    local1 notice
        chroot /var/lib/haproxy
        stats socket /run/haproxy/admin.sock mode 660 level admin expose-fd listeners
        stats timeout 30s
        user haproxy
        group haproxy
        daemon

#Defaults, also from Debian upstream
defaults
        log     global
        mode    http
        option  httplog
        option  dontlognull
        timeout connect 5000
        timeout client  50000
        timeout server  50000
        errorfile 400 /etc/haproxy/errors/400.http
        errorfile 403 /etc/haproxy/errors/403.http
        errorfile 408 /etc/haproxy/errors/408.http
        errorfile 500 /etc/haproxy/errors/500.http
        errorfile 502 /etc/haproxy/errors/502.http
        errorfile 503 /etc/haproxy/errors/503.http
        errorfile 504 /etc/haproxy/errors/504.http
HTTP Config - Redirect to HTTPS⌗
This is an HTTP config which redirects everything to HTTPS, so we don’t also need to proxy HTTP/1.1 over port 80
# Listen on port 80, layer 7 (HTTP)
# Redirect everything to https
# That leaves the client to reconnect properly,
# and means we don't need to proxy HTTP, just HTTPS
frontend www
        mode http
        bind :80
        http-request redirect scheme https
HTTP Config - Layer 7 Proxy⌗
Here’s a version of the HTTP config which actually does proxy port 80, if you want to continue to support non-TLS connections and/or HTTP-01 ACME challenges (Caddy supports TLS-ALPN-01 so it can work over 443 without 80 proxied).
# For port 80, we can do layer 7 (HTTP)
# Since it's insecure, there's no reason to do layer 7
# since there are no certs or encryption to interrupt
frontend www
        mode http
        bind :80
        # We are building the name of the backend from the 'host'
        # field in the request plus the literal '_http'
        # See backends for an example of how to name them
        use_backend %[req.hdr(host),lower,word(1,:)]_http

# Backends for HTTP
backend test1.apalrd.net_http
        mode http
        server test1_http 2601:40e:69:69:0:0:0:feed:80
backend test2.apalrd.net_http
        mode http
        server test2_http 2601:40e:69:69:0:0:0:beef:80
HTTPS Config - Layer 4 SNI Proxy⌗
And of course, the layer 4 SNI proxy for TLS works similarly, but at layer 4 instead of layer 7
# For port 443, we want to do a TCP proxy so
# we don't have to terminate the TLS session.
# Since we are only doing this for IPv4 clients,
# We don't want the private keys both here (for v4)
# and on the real server (for v6).
frontend www-tls
        # Layer 4 (TCP) mode
        mode tcp
        # Use TCPlog mode instead of HTTPlog
        option tcplog
        # Listen on TCP 443 (HTTP/1.1 and HTTP/2)
        bind :443

        # Wait for SSL Hello before forwarding
        tcp-request inspect-delay 5s
        tcp-request content accept if { req_ssl_hello_type 1 }

        # Select backends for each server
        # Similar method to above, but using '_tls' on the end
        use_backend %[req_ssl_sni,lower,word(1,:)]_tls

# Backends for TLS servers
backend test1.apalrd.net_tls
        mode tcp
        server test1_tls 2601:40e:69:69:0:0:0:feed:443
backend test2.apalrd.net_tls
        mode tcp
        server test2_tls 2601:40e:69:69:0:0:0:beef:443
Logging⌗
HAProxy uses rsyslog by default to log, so we won’t get a log file unless we install that package too. So, let’s do that:
apt update && apt install rsyslog -y
systemctl enable --now rsyslog
Now you should find an /var/log/haproxy.log file for you to explore! Be aware that it may fill up and you should probably take care of that.