The Power of Zero-Trust Architecture: Building a Secure Internal Network with Nebula
Imagine if we could establish a level of trust that in our network, we can verify with certainty that a computer really is who it says it is. By bringing mutual authentication and trust into networking, we can better make security decisions on when connections should be allowed. This can enable our services to talk to each other securely over the global internet, and reduce the dependence on a a trusted perimeter. This mututal trust is the foundation of a zero-trust security model. In this video, I’m going to walk through the basics of zero-trust security, the choices I’ve made to implement it in my own network. One of those choies is Nebula, an open-source zero trust overlay network designed for highly scalable distributed networks. Come along on this adventure!
Contents⌗
- Video
- Zero Trust Architecutre
- My Zero Trust Setup
- What is Nebula?
- Standing up a Network
- Mapping Out the Network
- Install Nebula
- Setup the Certificate Authority
- Create and Sign Node Certificates
- Setup the Lighthouse
- Setup the Client on Linux
- Relaying
- Security
- Links
Video⌗
 This absolutely beautiful image comes from NASA and the James Webb Space Telescope. Go Science!
Zero Trust Architecture⌗
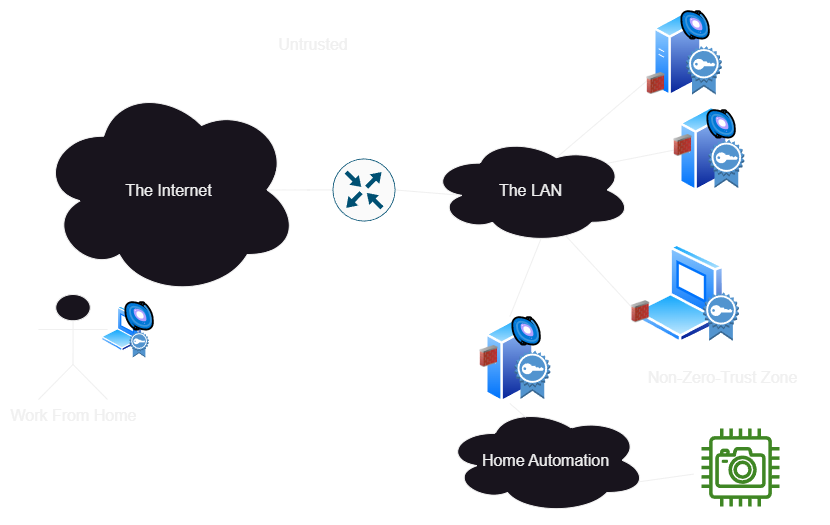
If you’re into tech buzz words, you might have heard of a ‘zero trust architecture’. A lot of companies are certainly pushing products in the space which take different approaches, but to understand it let’s first look at an example network that is certainly not zero-trust.
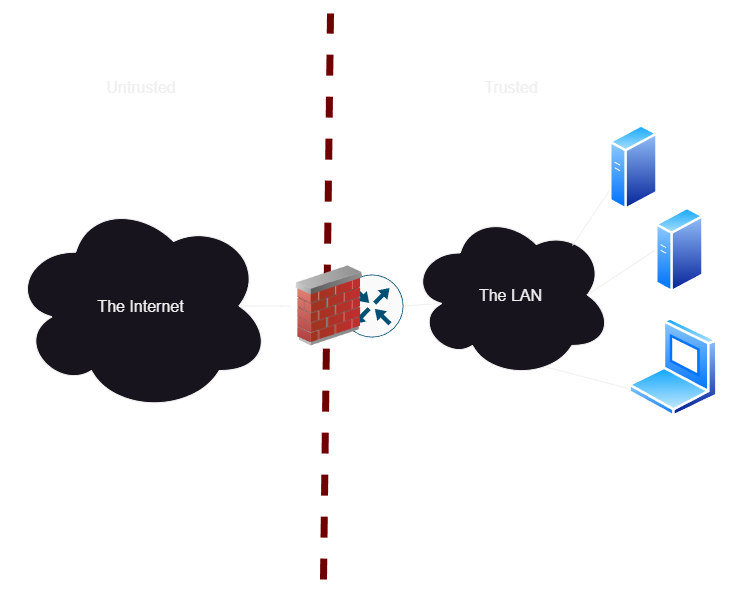
In this example, we consider the firewall to be our security plane. Users inside the network get access directly to services. In a lot of organizations, they are even running without encryption on internal services like this! I made a video on fixing that internal TLS cert issue, card up there. In general, we trust that devices belong on the network becuase they are within the security plane behind the firewall, but we probably also have some token of security like basic passwords to access systems.
But what happens when an attacker is able to compromise a single laptop? Now they can hunt every single service we have running, bang at SSH to see if you actually changed the password on your Raspberry Pi’s, see all of your unencrypted security cameras which you thought were local only, etc. And all from one compromised machine! If only there was a way we could limit the blast radius of a single machine down to just the services it actually needs to talk to, hopefully reducing the chance that an attacker is able to spread laterally through our network.
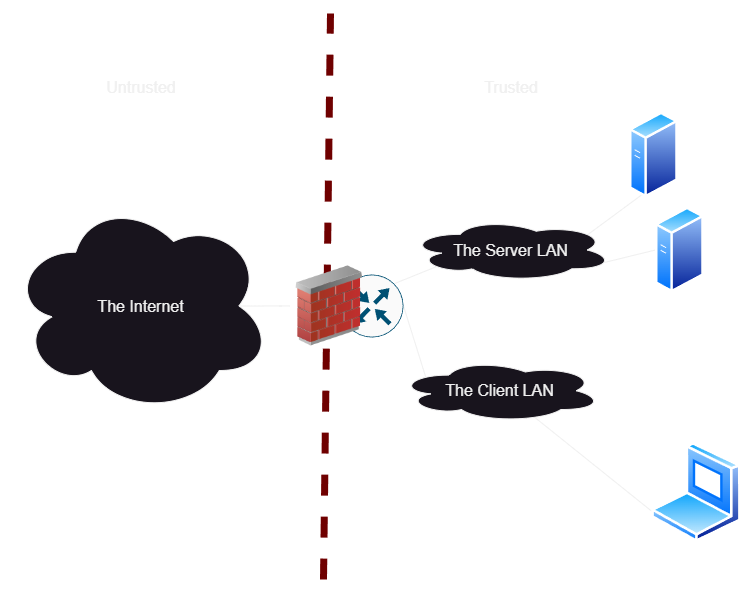
If we want better network security, we start to implement more subnets and VLANs. We are relying almost entirely on the firewall to filter what ports users should have access to, so we might need a whole lot of subnets to group everything by membership. This forces a ton of traffic to go through the firewall if we want really fine-grained firewall rules, which means we need a beefy firewall to handle all of the traffic across our network in one place.
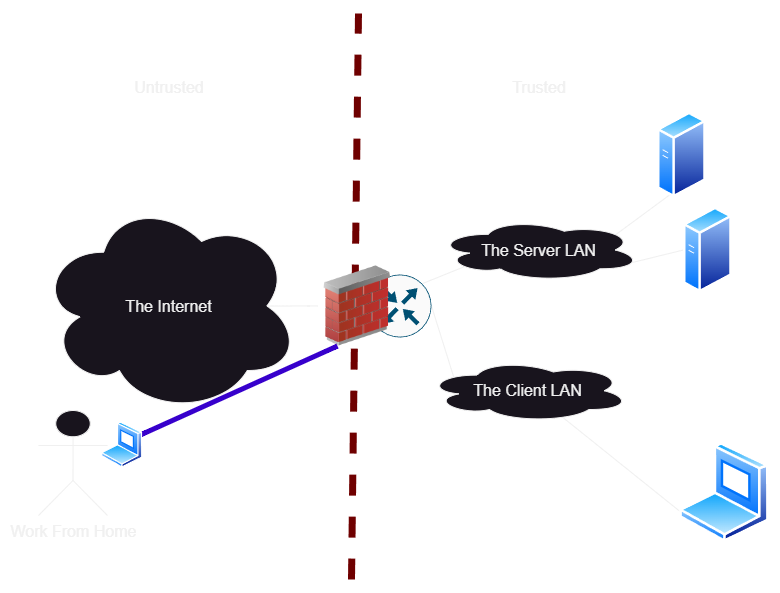
When we start asking for remote access, this gets even more complicated. We start opening holes in our security plane to allow remote users in, via VPN tunnels. Usually this is secure, but it expands our security wall even further. If we are using cloud services, we might be spinning up new cloud instances of routers just to tunnel traffic via a VPN, so everything is within our secure perimeter.
As an extreme example, we can connect every single device directly to the firewall, and force all traffic to go through it so we can filter it all. We might be able to do this on high end switches, but it’s an expensive proposition on a network of really any scale.
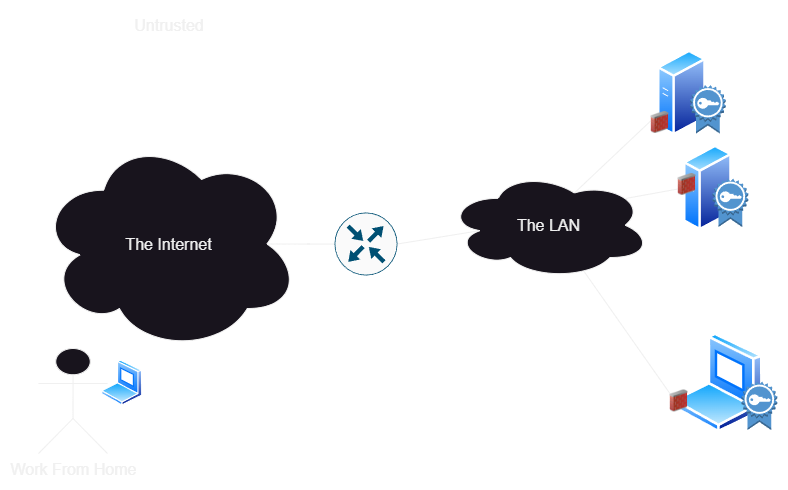
So zero-trust brings a simple distributed solution. We get rid of the central firewall, and move it to every single node. Okay, maybe we don’t get rid of it entirely, but we stop asuming that the firewall is a perfect line of defense. Now, the key tenet of zero trust is that we mutually authenticate both sides of every single connection before exchanging any data. Since we’ve mutually authenticated each other, we can rely on this strong cryptographically verified identity to know what should have access to what, without bringing in physical network changes.
My Zero Trust Setup⌗
Now, all of this sounds fantastic in concept. But, by moving the firewall to every node, we’ve created a bit of a configuration management hell for ourselves. How do we know what to trust? Who should be able to access what services?
This is the key question solved by zero-trust solutions, and each vendor or open source project will have a different answer. Here’s the solution I’m working with for my network currently:
- For services to talk to other services, and for admin access to management UIs that aren’t for end-users, I’m using Nebula. This provides an overlay network with secure, authenticated access to anything at layer 3. That’s covered in this video.
- For services which users need to access, I’m going to deploy mutual TLS. This will authenticate users devices via hardware certificates. This gives me confidence that a user is logging in from their own device or security key without needing to install any software on their device. I’m actually already using this, but I’m still working on a good workflow for enrolling users so this is a topic for a future video.
- Of course, there are some cases where neither of these are a good choice, so I can continue to do segmentation in the traditional sense in parallel to the more modern approaches. Hopefully I can phase them out over time. In particular, I’m going to keep zero trust out of my security camera and home automation devices, as they are already struggling to implement IP at all. I’m also not going to use zero trust in the Ceph storage network, since it can’t afford to take the performance hit.
I’m not going to setup a whole-network remote access VPN such as Wireguard, Tailscale, or OpenVPN. Implemented properly, a zero trust solution can remove the need for site to site VPNs between homelabs, datacenters, and cloud providers and also obsolete SD-WAN solutions. I will still use these things to give me unfiltered internet access on the go or avoid geo restrictions, but not as a security mechanism.
What is Nebula?⌗
So when you think of a VPN, you probably think of a point to point connection, between you and a cloud provider, you and your home network, or office, or something like that. Nebula creates individual VPN tunnels directly between nodes on demand, allowing anyone participating in your private mesh to access services. To properly deploy it, you don’t just open up your whole network to Nebula and bring back the perimeter firewall model, you install it individually on all of the hosts you want to communicate with.
Once everyone has Nebula installed, they don’t need any port forwarding to work. The Nebula transport works over both IPv4 and IPv6. Clients start with the public address or domain name of one or more Lighthouse nodes, and from the lighthouse they can discover all of the possible addresses of all other nodes, to establish secure tunnels on demand.
Nebula also integrates a role-based firewall at every single node, where we can filter packets coming in and out of the node based on the group membership of the other node in the tunnel. Since the other nodes identity and group membership is cryptographically verified, no central source of authentication truth is needed, and the network can function without trusting anything but the root certificate.

Standing Up a Network⌗
Finally understand what the big deal is with zero trust and Nebula? Lets’s stand up a network! For this example, I’m going to use my laptop, a Proxmox server, and a lighthouse. The lighthouse is the only node that needs a public IP address or port forward, and I’m going to set it up in a cheap Nanode instance on Linode. Why Linode? It’s what I’m already using. Hetzner is cheaper.
Mapping Out the Network⌗
Before we start signing certs, we need to give each node a fully qualified domain name and IP address on the overlay. Nebula currently only supports IPv4 within the overlay, so we’re going to set aside a nice large space for all of our hosts to get randomly assigned addresses. Since the IPv4 world is full of bad practices, I’ve decided to go ahead and continue that and chose the perfect prefix for my network: 42. As you know, it’s the answer to life, the universe, and everything, so hopefully nobody minds that my private network is 42.69/16. For individual node addresses I’m using a random number generator in most cases.
(In case you are actually thinking about using IPv4 squat space, you might want to read this article on the dangers of squat space)
Unlike normal IPv4, each node is a /32 and the network is fully routed, so there are no concerns about subnetting it down and losing addresses everywhere to the network and broadcast and gateway. We truly have 65k host addresses.
I also decided to place all of my nodes under the domain neb.apalrd.net, which lets me delegate the Nebula network as an authoritative name server for that subdomain. It also makes it clear that addresses are within the nebula network.
Install Nebula⌗
First, we need to get the Nebula binaries for our operating system. It’s the same process for every OS, so you’ll need to do this on the laptop, server, lightouse, all of them.
#Copy the link from the lates release on Github: https://github.com/slackhq/nebula/releases/
wget https://github.com/slackhq/nebula/releases/download/v1.7.2/nebula-linux-amd64.tar.gz
#Untar it into /usr/local/bin so it's accessible (it's just two binaries, nebula and nebula-cert)
tar -xzf nebula-linux-amd64.tar.gz -C /usr/local/bin
If you’re in an LXC Container on Proxmox, you additionally need permissions to create your own tun devices, and need a privilaged LXC container. Add this to the container config, which will be /etc/pve/lxc/<vmid>.conf:
lxc.cgroup2.devices.allow: c 10:200 rwm
lxc.mount.entry: /dev/net dev/net none bind,create=dir
If you’re able to get permissions right on an unprivilaged container to use tun devices, let me know how and I can update the guide. I’ve already spent a long time on this lol
Setup the Certificate Authority⌗
You can do this on any machine, even one that isn’t part of the Nebula network. You just need a way to copy the certs out later. They are really tiny, copy and paste works fine. You should NOT do this on the lighthouse, since that’s the most likely system to be compromised. I’m doing it on my laptop.
This one is way easier than the x509 stuff we did in OpenSSL! Do this on whatever node you want to keep your key on, it can be any node.
#Name it whatever you want
nebula-cert ca --name "ApalrdsAdventures2023"
Now keep ca.key very private, and come up with a way to distribute ca.crt to all nodes in the cluster. I use cat and copy and paste the contents. Ansible would also probably make a good choice for this. Also remember that the CA expires after 8760h0m0s, but you can override this by setting the -duration <time> flag with hours/mins/secs. Client certs cannot last loner than the CA cert.
Create and Sign Node Certificates⌗
In this example, I’m creating and signing a cert for my laptop, my Proxmox VE cluster, and the lighthouse.
When you sign a Nebula cert, you are including group membership, hostname, and address in the cert. All of this is verified by other nodes, and is used later by DNS and the firewall, so get it right!
So anyway here’s my rapid fire commands to generate the certs I needed (obviously change this for your own network)
nebula-cert sign -name "lighthouse1.neb.apalrd.net" -ip "42.69.0.1/16"
nebula-cert sign -name "spaceship3.neb.apalrd.net" -ip "42.69.73.46/16" --groups "user,admin"
nebula-cert sign -name "pvering1.neb.apalrd.net" -ip "42.69.212.1/16" --groups "hypervisor,dev"
nebula-cert sign -name "pvering2.neb.apalrd.net" -ip "42.69.212.2/16" --groups "hypervisor,dev"
nebula-cert sign -name "pvering3.neb.apalrd.net" -ip "42.69.212.3/16" --groups "hypervisor,dev"
nebula-cert sign -name "pvering4.neb.apalrd.net" -ip "42.69.212.4/16" --groups "hypervisor,dev"
nebula-cert sign -name "pvering5.neb.apalrd.net" -ip "42.69.212.5/16" --groups "hypervisor,dev"
In the future once the network is stood up, it’s more secure to generate the private key on the device and transfer the public key to the certificate authority to sign it. For now, I’m generating them all and distributing them during the initial setup, but will switch to the more secure process once I’ve gotten the basics functional.
Also be very aware that your root key expires in a year, and your node keys by default expire a second before the root! So an automated process for rotating certs would be good. Something like Ansible, rotate them in your periodic update script or whatever. You can set the duration to anything from zero to the expiration of the CA’s cert using the -duration flag similar to above. This post is already too long to set that up too.
Anyway, the on-device keying process would be:
#Generate key on device
nebula-cert keygen -out-key laptop.key -out-pub laptop.pub

#Transfer laptop.pub to CA to be signed

#Sign cert on CA
nebula-cert sign -in-pub laptop.pub -name "spaceship3.neb.apalrd.net" -ip "42.69.73.46/16" --groups "user,admin"

#Transfer new crt back to device which generated the key
Setup the Lighthouse⌗
For this example, I’m running it on a Debian 12-based Nanode at Linode, with a public IPv4 and IPv6, at the name ls1.apalrd.net in DNS (both A and quad-A records), plus an NS record at neb.apalrd.net which points back to the lighthouse so my Nebula network resolves via public DNS (how fun!). All of these will be gone by the time the video comes out.
Since we want DNS to work, you might need to disable systemd-resolved stub listener (which would have taken port 53) before we setup the lighthouse, and here’s how to do that on Debian. On some systems it might already be disabled, so if you get any errors you can safely ignore them here.
#Write out a conf file change for resolved
echo DNSStubListener=no >> /etc/systemd/resolved.conf
#Restart service
systemctl restart systemd-resolved
For this node, we need the binaries, crt and key, the ca.crt (but NOT key), a simple lighthouse config, and a systemd service. Rename the crt and key to host.crt and host.key, and put them along with ca.crt in /etc/nebula.
Here’s the config (/etc/nebula/config.yaml):
# PKI paths
pki:
  ca: /etc/nebula/ca.crt
  cert: /etc/nebula/host.crt
  key: /etc/nebula/host.key

# Port settings
listen:
  #Default for this key is 0.0.0.0 which is v4-only and stupid
  host: '[::]'
  port: 4242

# No static hosts for lighthouses
static_host_map:

#Lighthouse settings
lighthouse:
  am_lighthouse: true
  # Enable serving DNS to anyone (Even our external IP)
  serve_dns: true
  dns:
    #Default for this key is 0.0.0.0 which is v4-only and stupid
    host: '[::]'
    port: 53

#Firewall settings
firewall:
  outbound:
    # Allow all outbound traffic from this node
    - port: any
      proto: any
      host: any

  inbound:
    # Allow icmp between any nebula hosts
    - port: any
      proto: icmp
      host: any
    # Allow DNS incoming since we are serving DNS at this lighthouse
    - port: 53
      proto: udp
      group: any
And the systemd service (/etc/systemd/system/nebula.service):
[Unit]
Description=Nebula overlay networking tool
Wants=basic.target network-online.target nss-lookup.target time-sync.target
After=basic.target network.target network-online.target
Before=sshd.service

[Service]
SyslogIdentifier=nebula
ExecReload=/bin/kill -HUP $MAINPID
ExecStart=/usr/local/bin/nebula -config /etc/nebula/config.yml
Restart=always

[Install]
WantedBy=multi-user.target
And finally, the commands to start it up (assuming you copied the cert/config files into /etc/nebula):
#Reload the daemon files
systemctl daemon-reload
#Start and enable the service
systemctl enable --now nebula
Setup the Client on Linux⌗
In this example, I’m using a Proxmox VE 8.0 system. Again, need to copy our host.crt, host.key, and ca.crt to /etc/nebula.
The config for this node (/etc/nebula/config.yml):
# PKI paths
pki:
  ca: /etc/nebula/ca.crt
  cert: /etc/nebula/host.crt
  key: /etc/nebula/host.key

# Need a static host map, using the DNS name of the lighthouse
static_host_map:
  #Put all of your lighthouses here
  '42.69.0.1': ['lighthouse1.palnet.net:4242']

#This is completely undocumented
#static_map is how to interpret static_host_map
#It defaults to ip4, trying to connect to the lighthouse
#using only ipv4. This sorta-kinda makes sense since the node
#knows its own public v6 already but not its public v4 (Via NAT)
#so connecting to the lighthouse via v4 lets it learn that
#For ipv6-only hosts, change to `ip6` instead
static_map:
  network: ip4

# Lighthouse config for clients
lighthouse:
  hosts:
    - '42.69.0.1'

#Listen
listen:
  #Default for this key is 0.0.0.0 which is v4-only and stupid
  host: '[::]'
  #Port of 0 means randomly choose, usually good for clients
  #Want to set to 4242 for relays and lighthouses
  port: 0

#Firewall settings
firewall:
  outbound:
    # Allow all outbound traffic from this node
    - port: any
      proto: any
      host: any

  inbound:
    # Allow icmp between any nebula hosts
    - port: any
      proto: icmp
      host: any
For the Systemd service, I used the same one as the lighthouse, so the same file / commands apply here.
If you want to put the keys in the config file directly instead of on-disk (might be easier for laptops or something idk) you can do it like this:
pki:
  ca: |
    -----BEGIN NEBULA CERTIFICATE-----
    CkgKFlRoZSBPbmUtSG91ciBOZWJ1bGEgQ0Eo/pL7jAYwjq/7jAY6IDIi7yqkRV9F
    1+tozxvnHCmuuuwdArt7YbMMdCR4AYm/QAESQHBitbcetbJ06RQckqGi+hXJXd/U
    TXKEul4TxP4Qxmd7g+cHDE6oYZhRwup+1xg/Sv9bMg2E2/LNXKV3rNf1Yw8=
    -----END NEBULA CERTIFICATE-----
If you have multiple root certificates, you just add them together in one file and it will trust them all. If you have automation on your servers, it would be a good idea to rekey the root certificate periodically, and this can be used to keep old certs valid during the transition.
Relaying⌗
Now this all works well, but what if my laptop roams to some public hotspot without IPv6? My servers only have IPv6, so they can’t peer with my laptop. The lighthouse can, since it has both v4 and v6, but that doesn’t help. So let’s go back to the configs for the lighthouse and server and enable peers of the server to relay through the lighthouse.
When relaying, the destination node must specify in its configuration which nodes are allowed to relay on its behalf, and the clients will use the list of allowed relays for a destination to try and connect if they are unable to connect directly. So if we are getting around NAT traversal that’s only a problem in one direction, or only care about sessions established from one side, we don’t need to add the relay to every single file. It’s still easy enough to add to everyone’s config.
We also need to specify in the node configuration if the node is allowed to be a relay, but relays don’t actually care who they are relaying for, just that they are allowed to relay. So, the lighthouse is going to be my relay and my Proxmox systems (which are v6-only) are going to get the lighthouse added as an available relay. If you have troublesome nodes behind many layers of NAT the setup for them would be similar.
Change to the lighthouse config (add this to the end):
#I can also be a relay
relay:
  am_relay: true
Change to the Proxmox server config (again add to the end):
#I can use the lighthouse as a relay
relay:
  relays:
   - 42.69.0.1
  am_relay: false
  use_relays: true
Now, the laptop can connect happily to the server, via the lighthouse.
Security⌗
Let’s see if we can understand how amazing the group-based distributed firewall is, let’s try a few examples. All of these need to go under the firweall.inbound section as one list, don’t add a bunch of firewall sections to one file.
Allow Anyone to access Web Server⌗
In this case, anyone can access port 443, so we are only using Nebula for secure tunneling and relying on the server for user authentication. Also useful for services that are network-wide, like DNS. In this case, we use the host field and it’s special value any. If we want to allow HTTP/3 (QUIC), we can set proto to any instead of tcp.
#Firewall settings
firewall:
  inbound:
    # Allow anyone to web server
    - port: 443
      proto: any
      host: any
Allow Admins to Web UI⌗
Pretty basic rule, server-side we specify the port and groups which can access that port. In this case, Proxmox only does HTTP/1.1, so it’s TCP only.
#Firewall settings
firewall:
  inbound:
    # Allow admins to the web UI of Proxmox systems
    - port: 8006
      proto: tcp
      group: admin
Allow Admins OR Breakglass to Web UI⌗
When we want to allow members of EITHER group, we write the rule twice. So, this would be the new rule:
#Firewall settings
firewall:
  inbound:
    # Allow admins to the web UI of Proxmox systems
    - port: 8006
      proto: tcp
      group: admin
    # Allow breakglass to the web UI of Proxmox systems
    - port: 8006
      proto: tcp
      group: breakglass
Allow Admins from US Region to Web UI⌗
When we want members to have BOTH groups, we write the groups as a yaml list. So, the rule:
#Firewall settings
firewall:
  inbound:
    # Allow admins from the us region to the web UI of Proxmox systems
    - port: 8006
      proto: tcp
      groups:
        - admin
        - region-us
Allow a Port Range⌗
Similar to the single-port, we can specify a range of ports.
#Firewall settings
firewall:
  inbound:
    # Allow admins to the VNC port range
    - port: 5900-5999
      proto: tcp
      group: admin
Links and Conclusion⌗
Here’s some links which might help you if you need more reference information: