How Much Power does a 3D Printer Consume?
I have a Prusa i3 MK3S 3D printer, and I use it for many projects I post here. I want to know roughly how much power it consumes while printing, to get a feel for both the peak power consumption of the printer (to, say, size an off-grid power system) and energy consumed for an average print. I know the cost of filament is pretty low for most projects, but I don’t know the cost of energy (or wear on the printer). This project seeks to remedy that, using a Sonoff S31 power monitoring smart plug flashed with Tasmota firmware. I also set up this smart plug to be controlled by OctoPrint as an added bonus.
Flashing and Configuring Tasmota⌗
I flashed my Sonoff S31 on my Tasmota Day. By the end of the ‘day’, I had a number of S31’s which had Tasmota flashed, and which were configured with the correct WiFi network and module type, but no other configuration.
The first step is to configure the MQTT broker. I am using the same broker as Home Assistant, although in this case commands will come from Octoprint instead of HA. Start by finding the IP address (I look on my router’s DHCP leases for new Tasmota devices), and connect to it over HTTP. It should show up with a big ‘ON’ or ‘OFF’ as well as a bunch of power measurement numbers, a toggle button, and configuration buttons. Click ‘Configuration’, then ‘Configure MQTT’, and enter the broker information. I don’t like how Tasmota pollutes the root namespace in MQTT with tele, cmnd, etc. so I change the default topic structure to be ‘raw/%topic%/%prefix%/, which ends up with a topic like raw/tasmota_123ABC/stat/POWER. I set this structure for my Tasmota devices when I was newer to MQTT, but now I would have chosen ’tasmota/%topic%/%prefix%/’, so tasmota devices get their own folder in the namepace, followed by each individual device. This is more of a personal opinion on how to structure MQTT topics. Save configuration here.
Another configuration which is optional is to change the name. It doesn’t need a name, but if you set it, it will show the name on the main screen and in the HTML title. To set this, go to Configuration -> Configure Other and set Device Name to whatever is meaningful to you. If you have a bunch of Tasmota devices, having the name listed on the top of the page can really help you ensure that you’re connected to the correct one.
Next, we need to change the telemetry period. By default, Tasmota on the S31 will send power readings every 300 seconds. I’d like more data, and the backend can deal with all that data, so I bumped it up to 30 seconds. From the main screen, click Console. Now, we need to change the value ‘TelePeriod’ to the number of seconds we would like
TelePeriod 30
It should return a JSON string of the new value, like ‘{“TelePeriod”:30}’. If it still says 300, you didn’t type it right. No equals, no comma, just the command and value.
Setting Up OctoPrint Plugins⌗
We have a bit of a dance in OctoPrint with plugins and subplugins. In the end, we need all of these plugins installed:
- MQTT
- HomeAssistant Discovery
- PSU Control
- PSU Control - MQTT
- MQTT for PSU Control
Some of these will already be installed if you started from my OctoPi Project. If you followed that guide, skip down to PSU Control, the first two plugins are configured identically.
MQTT Plugin⌗
Enable and configure this plugin first, by itself. This way, we can configure all of the topic prefixes before HomeAssistant Discovery messes with them. Setup your broker, topics (I used octoprint/<printer name>/ so I can add more printers later), and leave the rest of the settings as defaults.
HomeAssistant Discovery Plugin⌗
Enable and configure this plugin second. There is nothing to configure here, other than Device Name. I suggest setting it to the name of your printer, if you have more than one printer, so they won’t conflict. It should automatically generate a Node ID.
Now, you should see a new Device in Home Assistant. Feel free to do any configuration you’d like there. It’s not super important for the purposes of this project, and it’s the same as my OctoPi Project.
PSU Control, PSU Control MQTT, and MQTT for PSU Control⌗
The naming of all of these is a bit odd. PSU Control is a plugin which allows OctoPrint to control the power supply of your printer. It relies on sub-plugins to provide different interfaces to PSU control switches, and provides a UI and common startup/shutdown settings for all of them. In our case, the sub-plugin we are using is PSU Control - MQTT which sends the PSU on/off messages and returns status via MQTT. The third plugin, MQTT for PSU Control, is not a sub-plugin which provides a PSU interface, but instead provides access to the PSU Control switch via Home Assistant over MQTT.
PSU Control⌗
For PSU Control, set the Switching Method to Plugin, and select PSU Control - MQTT as the plugin. For Sensing Method, again select Plugin, and again select PSU Control - MQTT. I set the polling interval to 1 second. For Power On Options, I added a 15 second Post On Delay to allow the printer to boot up, and enabled Connect when powered on. Finally, I set Power Off Options to turn off after idle for 30 minutes, and to disconnect from the printer.
PSU Control - MQTT⌗
For PSU Control - MQTT, we need to set the topics of our Tasmota smart switch. Since I changed the default topics, my command topic is ‘raw/tasmota_049BED/cmnd/POWER’ and my status topic is ‘raw/tasmota_049BED/stat/POWER’, with ON and OFF being the payloads for both topics. Tasmota publishes state reliably, so no need to poll for state and we can disable the ‘actively query for switch state’ option.
MQTT for PSU Control⌗
For MQTT for PSU Control, first go into the HomeAssistant Discovery plugin and copy the Node ID. Then, go into the configuration page for MQTT for PSU Control and paste this Node ID under the HomeAssistant automatic MQTT discovery heading. This will add the PSU Control switch to the existing Device created by the HomeAssistant Discovery plugin. Check ‘activate HomeAssistant support’ and ‘add switch entity to existing device’, and change the Switch Name if you wish. Device Name will be inherited from HomeAssistant Discovery, since they share the same node ID and we are adding the switch to an existing device.
Adding Power Monitoring to Home Assistant⌗
Since I’m controlling the power relay through OctoPrint, I don’t want to add it directly as a switch in Home Assistant. The PSU control integrates with Home Assistant already, so the switch is already exposed indirectly through the OctoPrint device. I just want to capture the sensor data, since OctoPrint’s plugins don’t do that.
All of the sensors are numeric and exposed by Tasmota in a single JSON-encoded message, so all of them become sensor entities in Home Assistant. Therefore, we edit sensor.yaml and add each signal as a sensor. Also note that I use a different topic path than the Tasmota default, so you may need to adjust the paths (use MQTT Explorer if you need to find the paths).
#3D Printer Power consumption data
- platform: mqtt
  name: "Columbia Power [W]"
  unique_id: "columbia_power_w"
  state_topic: "raw/tasmota_049BED/tele/SENSOR"
  value_template: "{{value_json['ENERGY']['Power']}}"
  unit_of_measurement: "W"
  device_class: "power"
  availability:
    - topic: "raw/tasmota_049BED/tele/LWT"
      payload_not_available: "Offline"
      payload_available: "Online"
- platform: mqtt
  name: "Columbia Voltage"
  unique_id: "columbia_power_v"
  state_topic: "raw/tasmota_049BED/tele/SENSOR"
  value_template: "{{value_json['ENERGY']['Voltage']}}"
  unit_of_measurement: "V"
  device_class: "voltage"
  availability:
    - topic: "raw/tasmota_049BED/tele/LWT"
      payload_not_available: "Offline"
      payload_available: "Online"
- platform: mqtt
  name: "Columbia Current"
  unique_id: "columbia_power_i"
  state_topic: "raw/tasmota_049BED/tele/SENSOR"
  value_template: "{{value_json['ENERGY']['Current']}}"
  unit_of_measurement: "A"
  device_class: "current"
  availability:
    - topic: "raw/tasmota_049BED/tele/LWT"
      payload_not_available: "Offline"
      payload_available: "Online"
- platform: mqtt
  name: "Columbia Energy [kWh]"
  unique_id: "columbia_power_kwh"
  state_topic: "raw/tasmota_049BED/tele/SENSOR"
  value_template: "{{value_json['ENERGY']['Total']}}"
  unit_of_measurement: "kWh"
  device_class: "energy"
  state_class: "total_increasing"
  availability:
    - topic: "raw/tasmota_049BED/tele/LWT"
      payload_not_available: "Offline"
      payload_available: "Online"
- platform: mqtt
  name: "Columbia Power Factor"
  unique_id: "columbia_power_fac"
  state_topic: "raw/tasmota_049BED/tele/SENSOR"
  value_template: "{{value_json['ENERGY']['Factor']}}"
  unit_of_measurement: "%"
  device_class: "power_factor"
  availability:
    - topic: "raw/tasmota_049BED/tele/LWT"
      payload_not_available: "Offline"
      payload_available: "Online"
The Print⌗
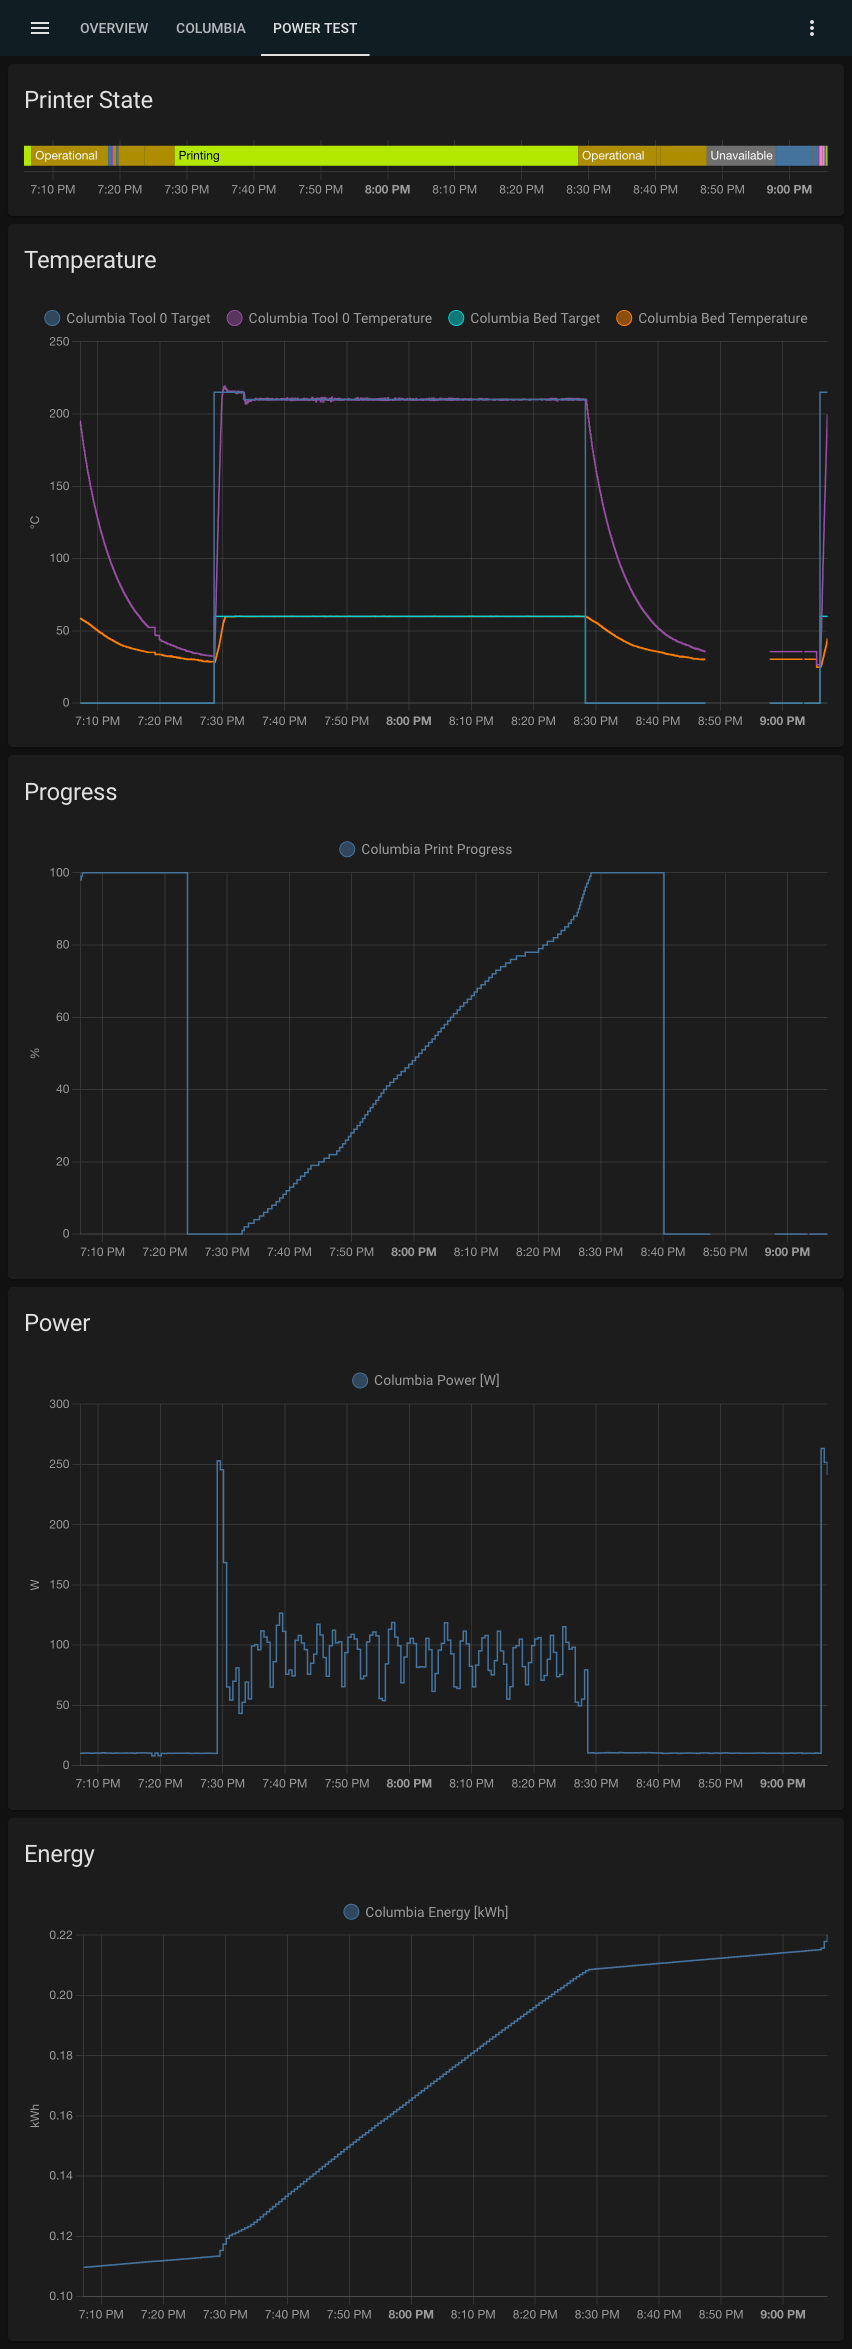
I printed a 3DBenchy for the purposes of this power test. The printer peaked at 245W during the warmup phase, averaged 92W during the print phase, and consumed just under 0.1 kWh during the roughly 1 hour print job. Home Assistant doesn’t show very many decimals and the numbers are pretty small, so the precision on that 0.1 kWh is probably +-10%. The idle consumption is also not negligible, at 10W. Leaving it on all the time would be roughly 7.2 kWh/month, which would cost around $1 (at my energy prices in 2021), purely for idling. The print doesn’t cost much in terms of energy, coming in at an energy cost of 1.3 cents (again at my energy prices in 2021). Overall, the energy expense of a single hobby 3D printer is not high enough to worry about.
The Project Files and Parts List⌗
Here are all of the parts required to replicate this project. There are no design files for this project.