Home Automation Christmas in September
It’s always a good day to receive new hardware, and today is no different. Over the past few days, I’ve received a bunch of hardware in the mail and I’d like to share my plans with you. Ever since I setup my first automations with my blinds and started automating my lighting and bathroom, I’ve been addicted to automating more and more of the house. So, after spending a lot of money on high end Z-wave motion sensors, dimmers, and switches, I went searching for some more cost-effective products to try out. WiFi, Zigbee, Z-Wave, and 433Mhz (sensors only) were all on the table. At this point, I have no data on how well any of these products work. I will start incorporating them into projects going forward, so follow along for the long-term data on how these end up working out! Here’s the total haul that came in over the last few weeks:
Inovelli Z-Wave Dimmers and Switches⌗
I’ve already used the Inovelli LZW36 dual fan+light switch module, which has an RF controlled canopy module allowing control of the fan and light without dedicated power wires for the fan and the light. I also have an LZW60 4-Way sensor (Motion, Light, Temperature, Humidity), which is used in my Smart Bathroom. After being impressed with this hardware, I decided to buy some of the backordered Inovelli red series dimmers and switches (LZW31-SN Dimmer and LZW30-SN Switch).

I only ordered two dimmers, so I’ll have to plan carefully where I put those, but I bought a 10-pack of switches, so I’ll have plenty of places to put those if I can get away without dimming. I already want to switch the exterior lights based on Frigate motion events, so we don’t have to ’leave the lights on’ when someone is out late. I’m sure I’ll find more uses for the dimmers and switches.
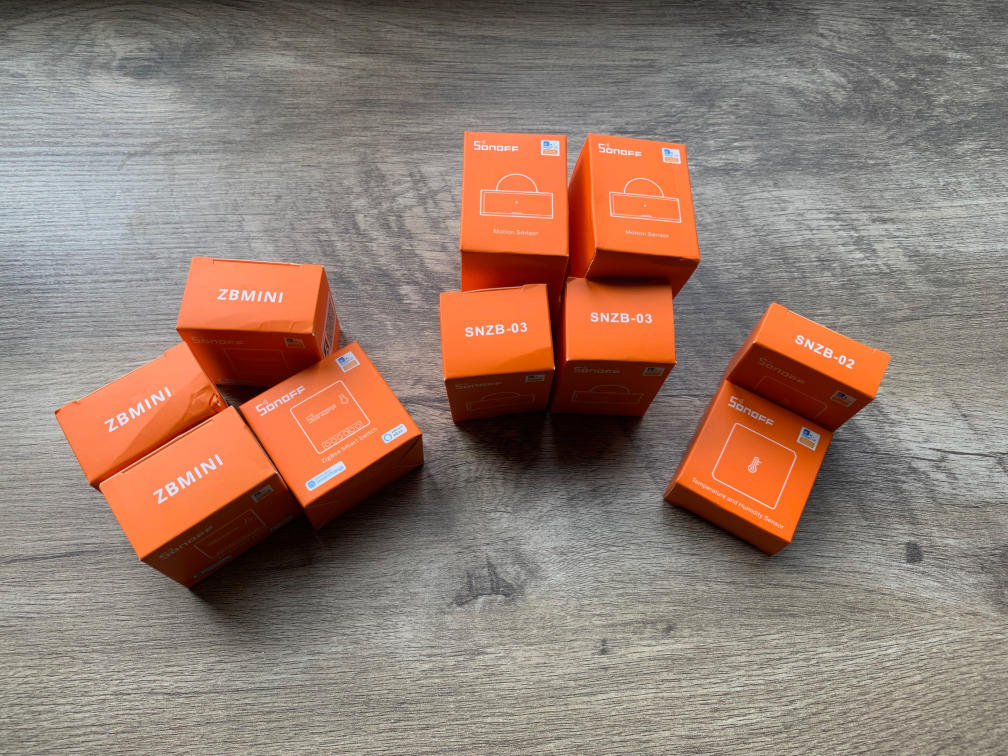
Sonoff (ITEAD) Zigbee Products⌗
I’ve used Sonoff products before, but only their ESP based products, which I flashed with Tasmota. This time, I went specifically for Zigbee. I’d still recommend their Wifi smart plugs (especially the S31 with power monitoring if you’re in the US), but for sensors I’m willing to tolerate Zigbee for better battery life over WiFi. They had a sale on Zigbee products, so I went a bit overboard and bought a lot. I bought directly from ITEAD and shipping via DHL was less than a week.
Overall, I got 3 products:
- SNZB-03 Zigbee motion sensor
- SNZB-02 Zigbee temperature + humidity sensor
- ZBMINI Zigbee version of the Sonoff Mini mains relay and switch
My plans for the products, and why I chose them:
- I’m trying to try a wide variety of low cost sensors to collect as much data on their reliability / functionality as possible before outfitting my future house with a ton of them. The SNZB-02 will go head to head against the much more expensive Z-Wave motion and more sensors (Aeotec 6-way multisensor and Inovelli 4-way multisensor) and the Xiaomi Aqara temperature + humidity sensor.
- The IKEA Zigbee motion sensor I have in my bedroom was out of stock, and I want to do more motion controlled lighting. The Sonoff SNZB-03 motion sensor also looks better (it’s physically smaller at least), is physically symmetrical, and has a cone of view optimized for ceiling or wall mounting, whereas the IKEA sensor was designed exclusively for wall mounting. This is important for stairway lighting where the sensor will be above the stairs.
- I have more bathrooms with combined fan+light on a single switch that I want to separate into control of the fan and control of the light. The Inovelli LZW-36 fan+light switch I already used is out of stock and not expected to return until 2022, and want to see if I can setup something as functional for less money for the less frequently used bathrooms. I plan on combining the ZBMINI with a smart bulb and a switch on the wall, and may experiment with Zigbee binding so it works during a hub failure.
- I didn’t buy the SNZB-04 door contacts from Sonoff, but maybe someday I’ll compare them against the Aqara door contacts. Pricing is about the same for both of them.
Xiaomi Aqara Zigbee Products⌗
Xiaomi is a well-known Chinese brand, and they have a sub-brand called Aqara for some of their home automation products using Zigbee. I purchased their sensors to compare against what I already have from IKEA and Sonoff. Since I went through Aliexpress, I had to wait a bit longer for shipping, but they were significantly cheaper than Amazon and were price competitive to Sonoff, with cheaper shipping, so they’re a great option if you plan ahead enough to be able to wait. I got a bit of a different variety here:
- Door And Window Sensor
- Water Leak Sensor
- Temperature, Pressure, and Humidity Sensor
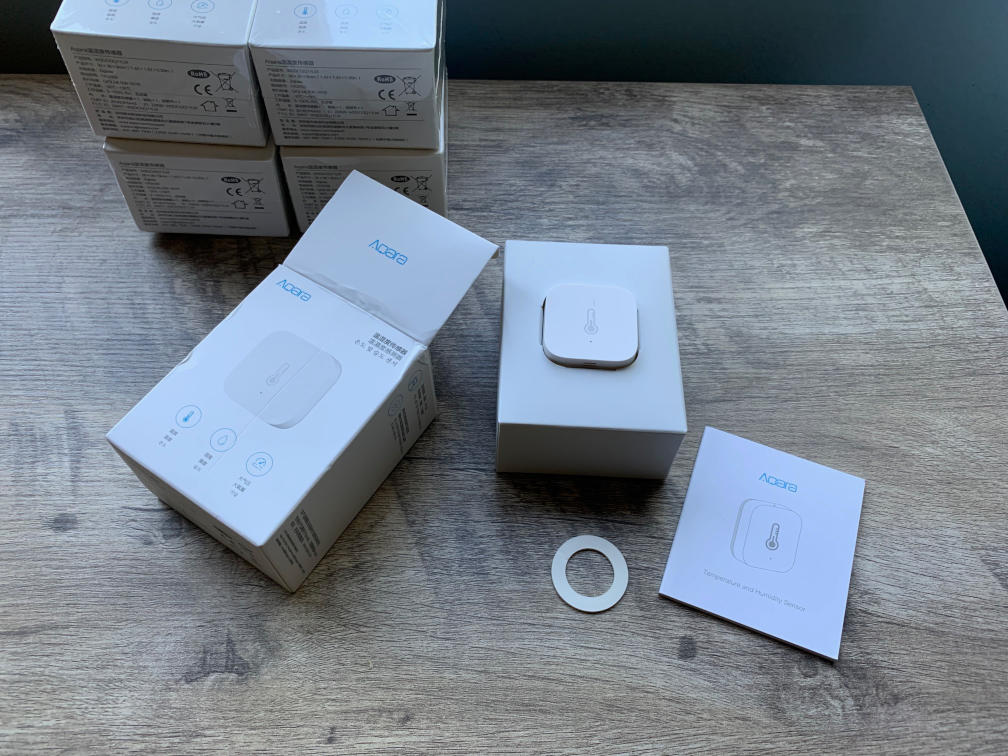
The box for the Temperature + Humidity sensor contains the sensor (which is really very small), small manual, and an extra foam tape ring (there’s already one attached to the sensor), but the whole white paper box inside is empty, meaning the packaging could have been considerably less wasteful. I setup the first sensor and paired it with my Zigbee network to verify that it works as expected, and it does.
My plans for the products, and why I chose them:
- The Aqara sensors seemed reasonably priced for door contacts, and they visually look better than the Visonic ones I have already (leftover from Xfinity, so I didn’t spend money on them). I’m going to try these out with overhead garage doors as well. No temperature data from these, although it’s not really necessary anyway. The Sonoff SNZB-04 door contact doesn’t have temperature either.
- The Temp + Pressure + Humid sensor will have a showdown with the similarly priced Sonoff model, which doesn’t include pressure. I don’t expect pressure to add a lot of functionality to the sensor. Additionally, although neither this sensor nor the Sonoff model are listed for outdoor use, this one has a narrower temperature range.
- The Water Leak Sensor is one of the cheapest water leak sensors available, so I thought I’d give it a try. As I mentioned in my Septic Control Project, we have previously had water backups in the basement as well as condensate drain failures leading to water on the floor, so I’ll put the 3 sensors I got in the basement and laundry room and see if they ever trigger.
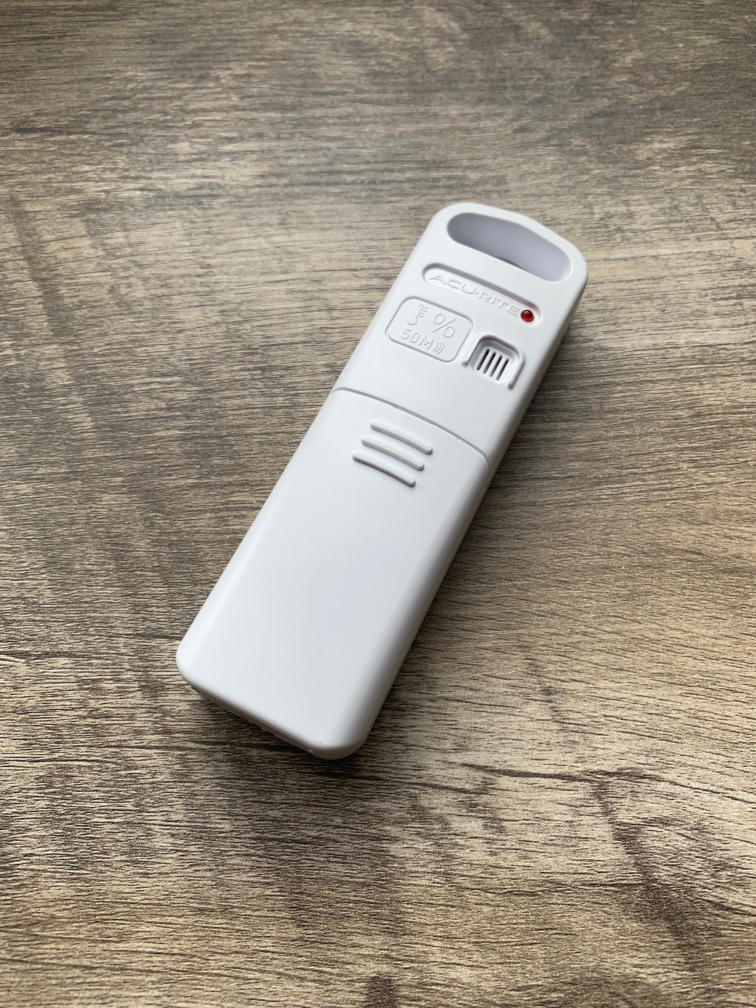
Acurite 433Mhz Outdoor Temperature Module⌗
I already put this one to use in the 433Mhz Sensor project, just a day after receiving it. Usually hardware sits on the bench for awhile before I get around to finishing a project, but the turnaround here was fast enough that the project page is already done before this blog entry. These cost $13 each plus $7 shippping for two and were received in less than a week. Link to Product. Performance is currently under review, data is being logged by Home Assistant and seems to be reasonable so far. rtl_433 has no trouble reading this sensor, and the update rate is pretty good (~30 seconds).
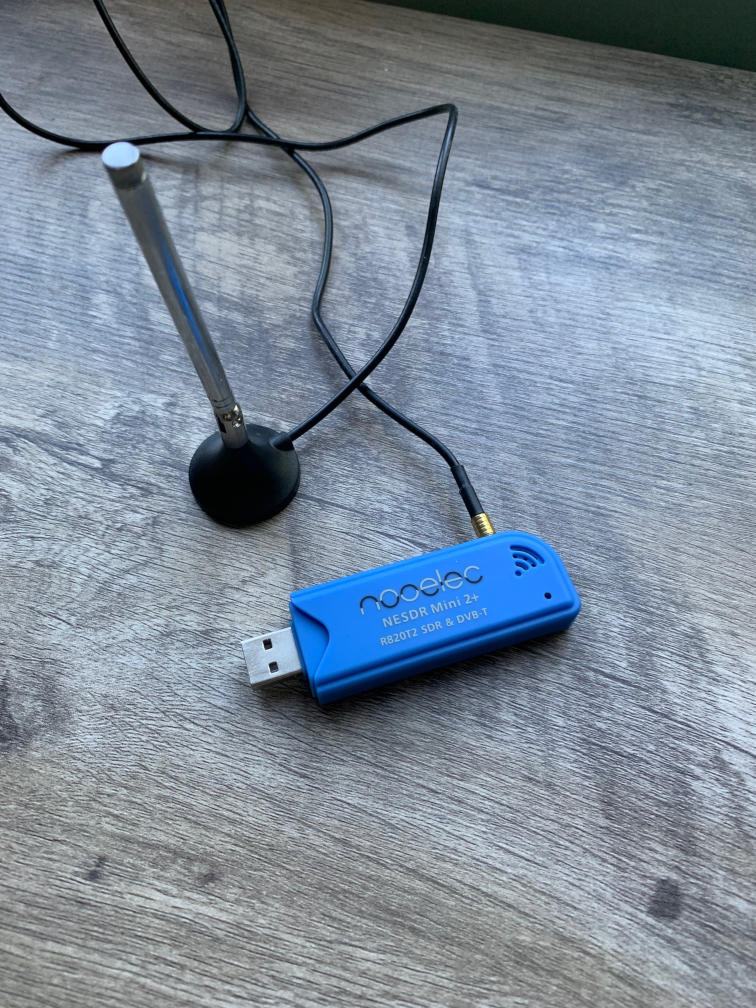
RTL-SDR Dongle (Another One)⌗
After setting up the 433Mhz Sensor project and committing my only SDR radio to be used for data acquisition, I soon after found myself wanting to play with SDR again in the rtlamr failed project. Since I only had one RTL-SDR dongle, I had to take down the 433Mhz sensor project for a day to use the dongle. I have now ordered another RTL-SDR dongle so I can continue to play with SDR based projects without interfering with my ‘production’ hardware. I previously looked for a low cost but not poorly reviewed dongle, and selected the Nooelec model for its low entry price. I could have gotten a nicer dongle this time, but I bought the same one, so maybe in my future third entry into SDR I’ll get serious about higher performance, low noise dongles.
Raspberry Pi 3 (Another One)⌗
With all the Pi’s I use in projects, even temporarily, I’ve found that my aging collection of Raspberry Pi’s is no longer adequate to run a lot of modern software. I’ve been working with Raspberry Pi’s for a long time, and as I re-use Pi’s from older projects they continue to age. A lot of newer software is no longer built for armv6l, or even 32-bit ARM any more. Here’s a bit of my collection:
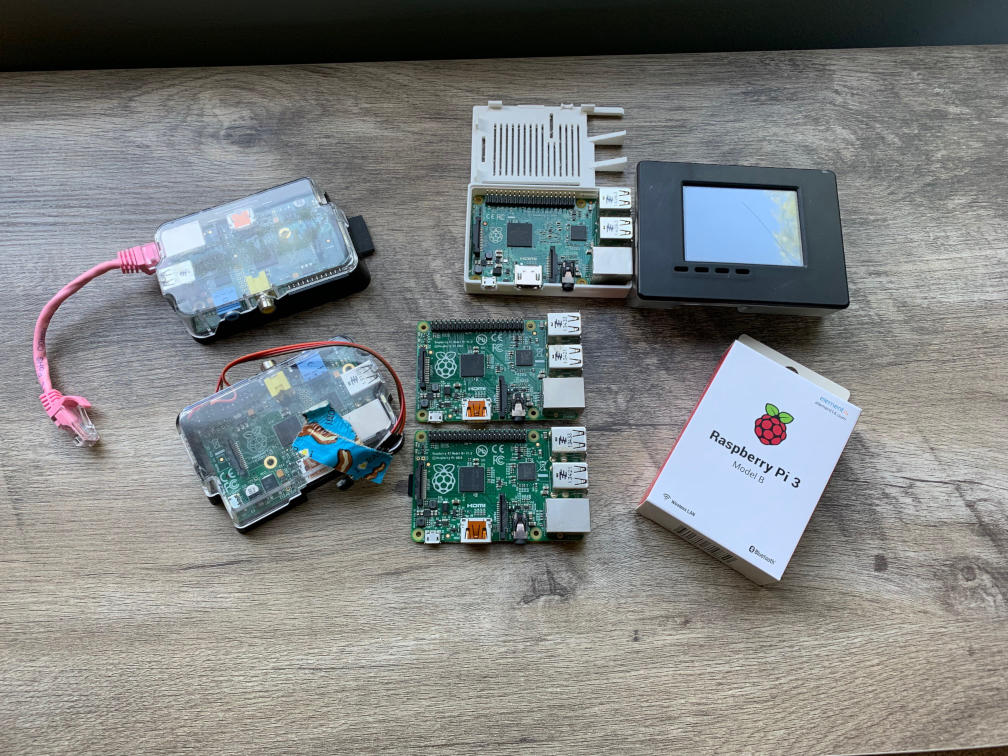
From left to right, bottom to top:
- My first ever Rasperry Pi, the original Model B with the funny mechanical layout and pre-dating the now standard 40 pin GPIO header and 4-hole rectangular mounting pattern, in an Adafruit Case. This Raspberry Pi ran Raspbmc (which later became OSMC), along with an IR receiver chip taped to the case with bacon duct tape, feeding its analog video output to my TV. Circa 2013.
- My second ever Rasberry Pi, used for many years as my NAS. I had a 2TB USB HDD attached and served files for XBMC (later Kodi) on the first Raspberry Pi, but I also used this to back up files from my laptop. I eventually setup XBMC MySQL sharing, so all of the TVs in the house could share a common media database and watched information
- A ‘New’ improved Model B+, which brought the new standard 40-pin header, mounting hole arrangement, and 4 USB ports, but was otherwise very similar to the OG Model B. This particular one was also used with Raspbmc, over HDMI, for the second TV in the house.
- Another Model B+, my second file server for my second 2TB drive. Due to the 100Mbps Ethernet limitation of the Pi, I used two separate Pi’s to reduce bandwidth bottlenecks to the two drives. At this point, I started naming my servers after spacecraft, and named this one ‘Voyager’.
- Raspberry Pi 2, which introduced an improved processor over the OG Raspberry Pi, in a 3D printed case. I bought a few of these to try a multicast multi-room audio system, but testing did not go well, so I ended up using one of this batch in a standalone audio setup with a HifiBerry Amp2 and Shairport-Sync along with some nice wired speakers on my deck, which I still use and love. This particular Raspberry Pi was later repurposed to run Octoprint, but I was unhappy with the performance of the older Pi and am rebuilding that for an upcoming project. Another Raspberry Pi 2 from this batch is currently in service as a USB print server, which has been reliable for many years.
- The brand new Raspberry Pi 3. At the time of this writing (September 2021), it’s very difficult to find a Raspberry Pi 3, 3+, or lower memory (lower cost) 4 in stock, so I just have one new one, and it’s already allocated to become an Octoprint server.
- This Raspberry Pi is in a very special case by Adafruit, designed to hold the OG Model B along with the OG PiTFT (back in the 26-pin days). I used this to build a user interface for a school project, loading the lite version of Raspbian (no desktop environment) and reading the touch drivers / writing the screen framebuffer raw. I published the GUI backend code on github as ‘palscreen’, but did not publish the other project files. Keeping with my space naming theme, I named this one ‘Discovery-One’, after the manned spacecraft from ‘2001: A Space Odyssey’, as the touchscreen makes this a ‘manned’ Raspberry Pi.